Your first show
This page takes you through one show from start to finish. If the window is new to you, read The main window first.
A projector or a second monitor helps, but you can follow every step without one. Whatever you send appears in the stage preview at the top left of the window; only the output window needs a real screen to open on.
You do not need to sign in to run a show. Only Settings (step 7) and sending a message with Tell us what’s wrong need you to sign in, once.
1. Make a presentation
Section titled “1. Make a presentation”A presentation is one set of slides — a song, a talk, a video and its titles. Presentations live in libraries, and the libraries sit in the Library drawer at the bottom of the sidebar.
The first time you open LayerCue, the library My Stuff already holds an empty New Presentation. Click it and it opens in the middle of the window. To give it a real name, right-click it in the sidebar and choose Rename.
To make another one, click the + beside Library and choose New Presentation.
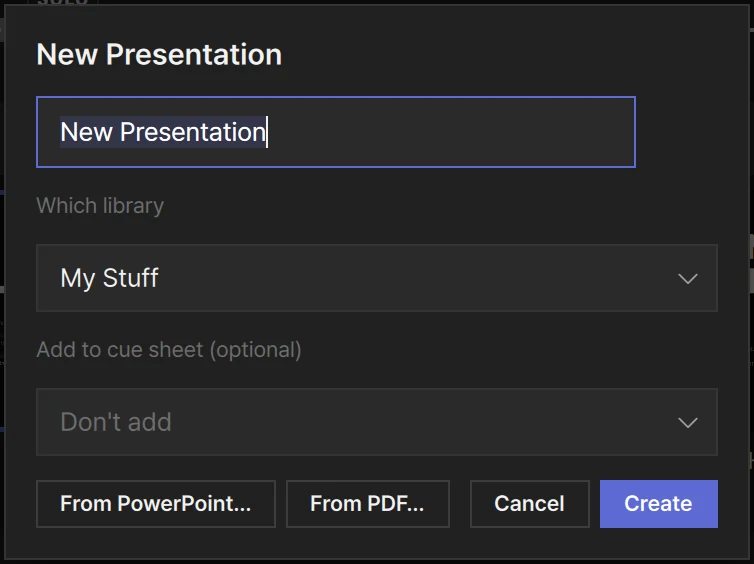
| Name | Type the name of the song or the talk |
| Which library | Where it will live. Every presentation lives in one library — check this before you press Create |
| Add to cue sheet (optional) | Leave it on Don’t add, or put it straight into a cue sheet |
| From PowerPoint… · From PDF… | Build the presentation from a file instead. See PowerPoint and PDF |
More than one presentation: a cue sheet
Section titled “More than one presentation: a cue sheet”For an event with several parts, make a cue sheet — the running order. Click the + beside Cue Sheets at the top of the sidebar and choose New Cue Sheet. It asks for a name straight away.
Then put presentations into it: right-click one in the library and choose Add to Cue Sheet, or drag it from the library up onto the cue sheet. The presentation is not copied; the cue sheet only points to it.
Select a library presentation and the middle shows that one presentation. Select a cue sheet and it shows every presentation in it, one after another, in order. The Tour cue sheet you find at first launch is one of these, holding the READ ME presentations.
More in Libraries and cue sheets.
2. Put in what you will show
Section titled “2. Put in what you will show”- Drag videos and pictures from the Finder / File Explorer into the middle — onto the presentation, or into the empty space below the last one, which adds them at its end.
- Or click + (Add File) in the row of buttons on the right of the presentation’s title bar.
- For YouTube, click the link button beside it (Link) and paste the video’s address. See YouTube.
- A PowerPoint (.pptx) or PDF file dropped in is imported as slides, at the spot where you drop it.
Files LayerCue cannot play are not added, and a message says so.
Drag the cards until they sit in the order they will go out.
Put in the wrong thing? ⌘Z / Ctrl+Z undoes it.
3. Choose the screen and switch it on
Section titled “3. Choose the screen and switch it on”The tile at the top left of the band is Output 1 — the screen your audience sees. Its header has a tab on the left (01 and a name) and a power switch at the right end.
Which screen. Click the 01 tab. A small panel opens with a name field and Screen.
- If a projector or second monitor was connected the first time you opened LayerCue, it is already chosen — and since the switch starts out on, the output is already open there, showing black.
- If not, Virtual screen 1920×1080 is chosen. A virtual screen only sets the shape you build for — nothing goes out to it; what you send shows only in the preview. Plug a real screen in while a virtual screen is chosen, and LayerCue switches to it by itself.
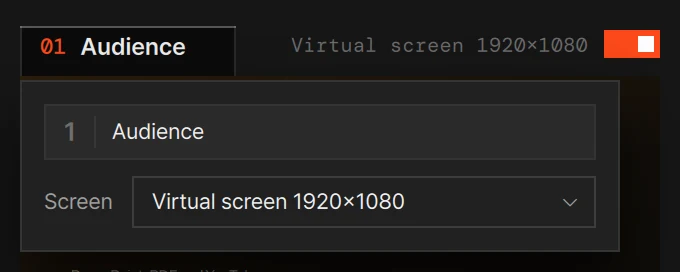
On or off. The switch at the right end of the header is that monitor’s output window. Switch it on and the window opens on that screen at once, black until you send something; the number 01 turns orange and the status bar reads On air 1/1. Switch it off and the window goes away — the screen shows its desktop again. LayerCue remembers the switch, so next time the output opens by itself once the app is ready, and when you plug its screen back in.
More than one monitor? Add them in Settings › Stage › Output monitors. A second tile appears next to the first, with that monitor’s own switch and Layers shown strip — see Multi-Output.
In the status bar at the bottom, the speaker box is the device the sound goes to. System default follows your computer’s own sound setting. Pick a device and, while LayerCue is open, your computer’s sound output switches to it as well, so YouTube’s sound goes there too; it is set back when you quit. More in Sound and the meter.
4. Check a slide without sending it
Section titled “4. Check a slide without sending it”Click a card’s name row (the strip with its name under the picture), or Option-click /
Alt-click the picture. Nothing goes to the audience screen; the slide only loads into
Slide settings on the right. That is what Option + slide to load next to the heading
means (Alt + slide to load on Windows).
What you set here is saved with the slide.
- Black bars around the picture? Choose Fill, the first of the four fit buttons. It fills the screen and trims the edges instead.
- Dead air at the start of a video? Move the preview to where it should start and press In point; to where it should end, and press Out point. Clear In/Out removes both.
If the window is narrow, Slide settings folds into a short summary at the right end of the band: the slide loads there, and its Slide settings heading opens the whole panel in a window of its own. Double-click the name row to open the slide in the slide editor.
5. Send it out
Section titled “5. Send it out”Click a card’s picture once and it goes out that instant — in the preview and on every monitor that is switched on. Sending never switches a monitor on: if you send a slide while all of them are off, LayerCue reminds you once — All monitors are off — turn one on with the power button above the preview.
| To | Do |
|---|---|
| Send a slide | Click its picture · right-click → Present |
| Send the next / previous slide | Click it · → / ← |
| Start a video again from the beginning | Double-click its picture |
| Send the slide loaded in Slide settings | Enter |
The arrow keys stay inside one presentation. At its last slide, click the first slide of the next one.
How long one slide overlaps the next is Crossfade, in Presentation settings — the Presentation settings button at the right end of the presentation’s title bar, or right-click the presentation in the sidebar. More in Presentation settings.
The output window
Section titled “The output window”The power switch on the Output 1 header opens and closes the output window (step 3). While it is open, the switch’s tooltip reads Stop Output, the number 01 is orange, and so is the dot of the on-air chip in the status bar.
If the monitor is switched on but its screen is not connected, the header says not connected; the window opens as soon as you plug the screen in. A virtual screen never gets a window.
6. Take it down
Section titled “6. Take it down”| To take down | Click | Keys |
|---|---|---|
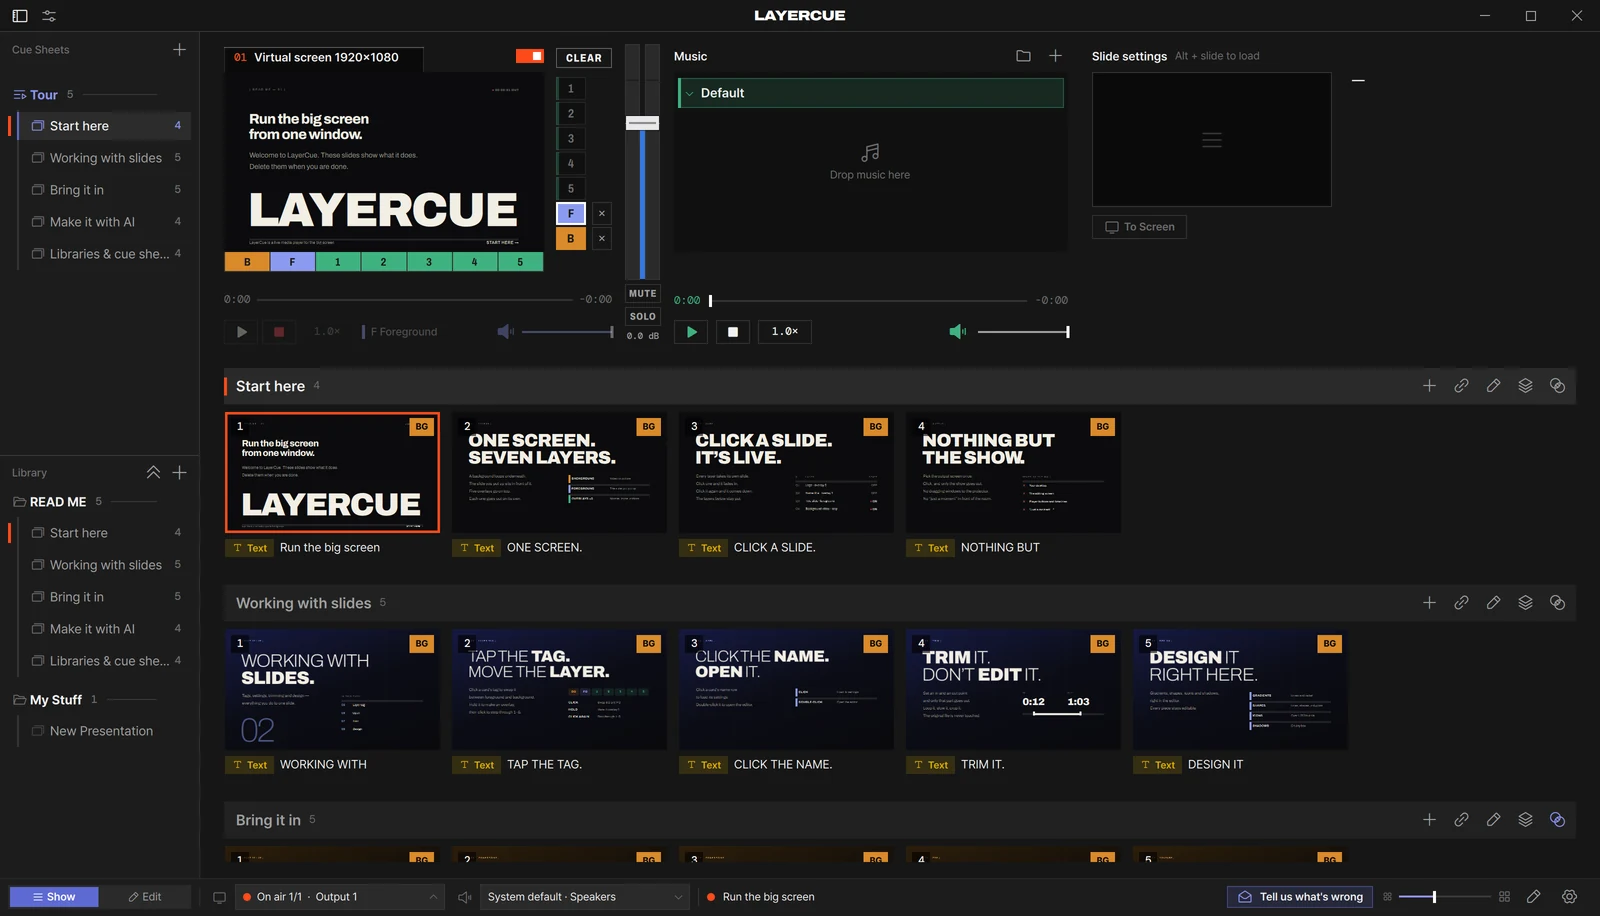
| Everything on screen | CLEAR at the top of the layer column beside the preview (Clear All) | F1, or ⌘1 / Ctrl+1 |
| The foreground only | The × beside F | F2, or ⌘2 / Ctrl+2 |
| The background only | The × beside B | F3, or ⌘3 / Ctrl+3 |
| The overlays | The × beside each number (F4 clears all five) |
F4, or ⌘4 / Ctrl+4 |
Unless you choose another layer, a slide goes out on the foreground (F). The × beside a layer (Clear this layer) appears only while that layer has something on it. The red ■ under the preview takes down only the video on the layer you are controlling — the one with the white outline. More in Layers.
On a Mac keyboard the F keys often control brightness and the like, so ⌘1–⌘4 is the sure way.
Clearing fades out over the Fade out time in Presentation settings. Clear All does not stop the music, and the output window stays open, showing black.
To close the output window, switch that monitor off with its power switch, or click the ✕ that appears when you move the mouse over the output — that switches it off too. Closing it does not clear anything: what is live keeps playing in the stage preview, sound included. Clear first, then close.
7. Lay music over it
Section titled “7. Lay music over it”The Music column sits in the middle of the band at the top of the window. Drag tracks onto it (Drop music here), or click its + (Add music). Music plays separately from the slides, so sending or clearing slides does not stop it. More in Music.
If a video’s sound and the music fight each other, open Settings › Stage › Music while video plays and choose Lower or Mute (the default is Keep). With Lower, set how far in Lower to. The music comes back by itself when the video ends.
Settings is the gear at the right end of the status bar. The first time, it asks you to sign in with Google once. More in Settings.
Before the event
Section titled “Before the event”If something does not work, see Help, press Tell us what’s wrong at the bottom of the window, or write to support@layercue.com.