Design tools
The slide editor is not only for words. You can put shapes, icons, pictures and videos on a slide, give boxes a gradient, a border or a shadow, and line everything up. This page covers those tools. For typing and text styling, see The slide editor.
Almost everything here sits in the first two rows of the ribbon, in four groups — Insert and Style in row 1, Change and Box in row 2:
| Group | What it holds |
|---|---|
| Insert | Add text box · Insert shape · Insert icon · Add picture · Add video |
| Style | Fill · Border color · Width · Radius · Box shadow |
| Change | Fill the slide · Set as background · the fit buttons for pictures and videos · Crop and fit video · the repeat and sound buttons of an added video · Change icon · Change shape |
| Box | Opacity · Rotation · Place (position, size and order) |
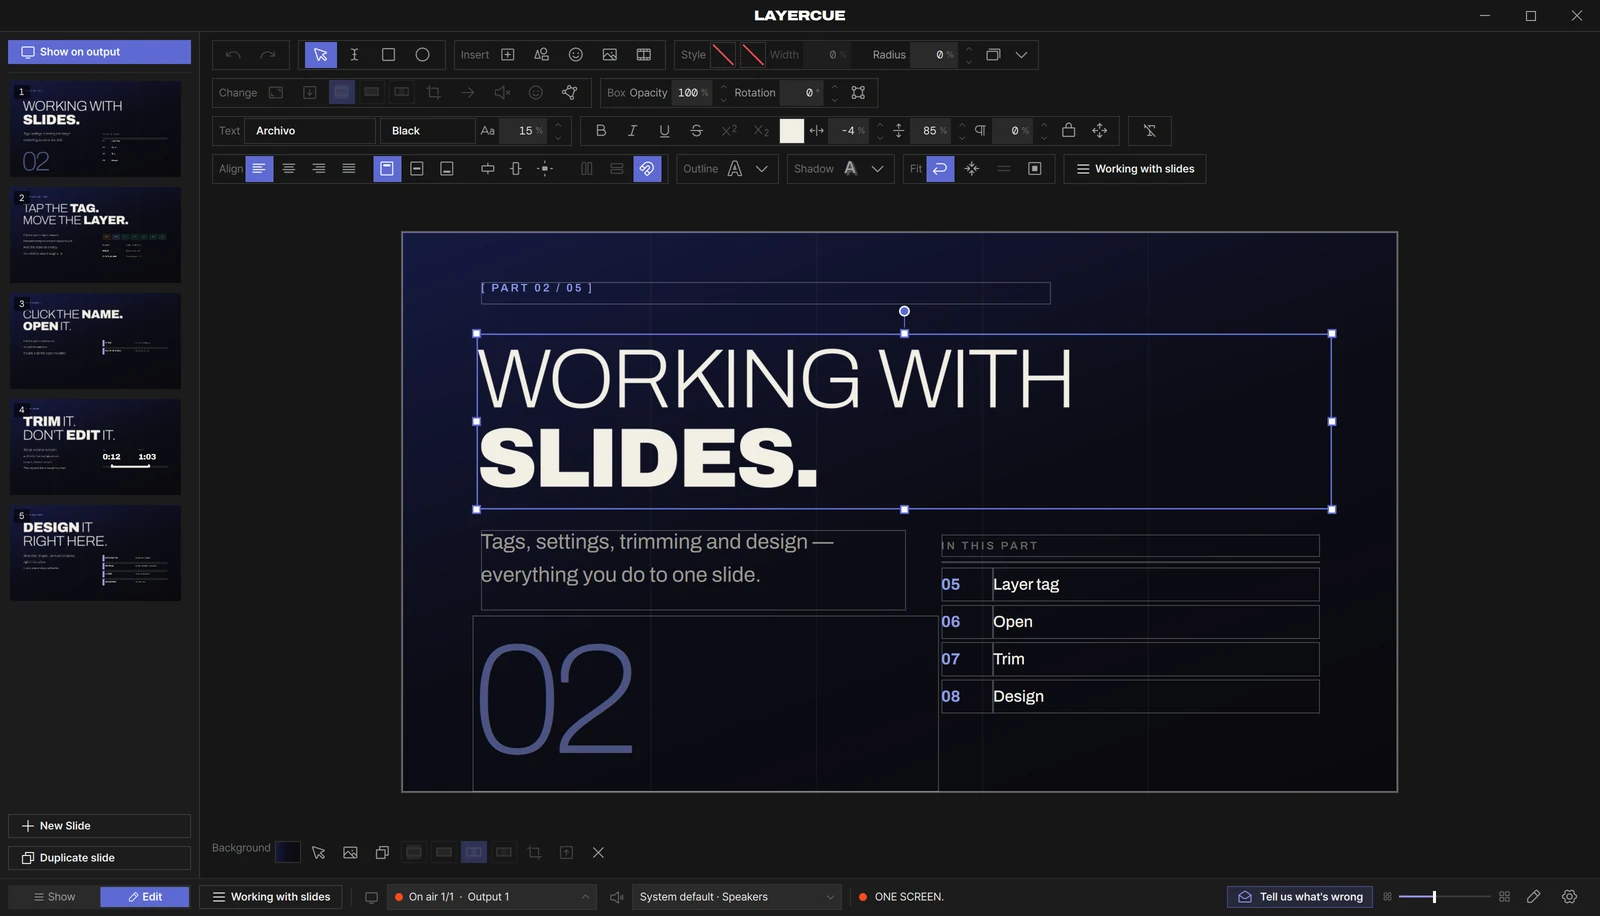
The group names stay the same whatever you select. A button that does not fit the selected box is dimmed, and many of them say why in their tooltip — for example Select a picture or video box to use this or Select a rectangle or text box to change its shape.
Putting things on the slide
Section titled “Putting things on the slide”Press a button in the Insert group. Insert shape and Insert icon open a picker, and
Add picture and Add video open a file dialog. Whatever you pick lands in the middle of the slide, already selected. One ⌘Z / Ctrl+Z takes it away again.
If another box already starts at exactly that spot, the new one steps a little down and to the right so you can see it.
To put it somewhere else from the start, right-click an empty part of the canvas instead:
Paste · Add text box · Insert shape… · Insert icon… · Add picture… · Add video…
Whatever you add from this menu is placed where you right-clicked.
When you cannot add anything, the Insert buttons are dimmed and the tooltip says why: Pick a slide first, or Text can’t go over full-screen YouTube streaming on a YouTube slide set to Streaming. Put the YouTube in a box with Make it a video box in the Background row under the canvas — or download it and switch it to Downloaded — and you can.
Shapes
Section titled “Shapes”Insert shape offers fourteen shapes:
Rectangle · Rounded rectangle · Ellipse · Triangle · Diamond · Pentagon · Hexagon · Octagon · Star · Arrow · Chevron · Trapezoid · Slanted band · Cut corner
You can also draw a rectangle or an ellipse yourself with the Rectangle and Ellipse tools near the left of ribbon row 1. While a tool is in your hand, a hint line above the slide reminds you how it works:
| Do this | What you get |
|---|---|
| Drag | a shape the size you drew |
Shift while dragging |
a square or a circle |
Option / Alt while dragging |
drawn out from the point where you started |
| Click without dragging | a shape at its default size |
⌘ / Ctrl while dragging |
no snapping to edges and other boxes |
Esc |
cancel |
After one shape the Select tool comes back on its own.
Shapes can hold text. Double-click a rectangle, an ellipse or any of the polygon shapes and type.
Change shape
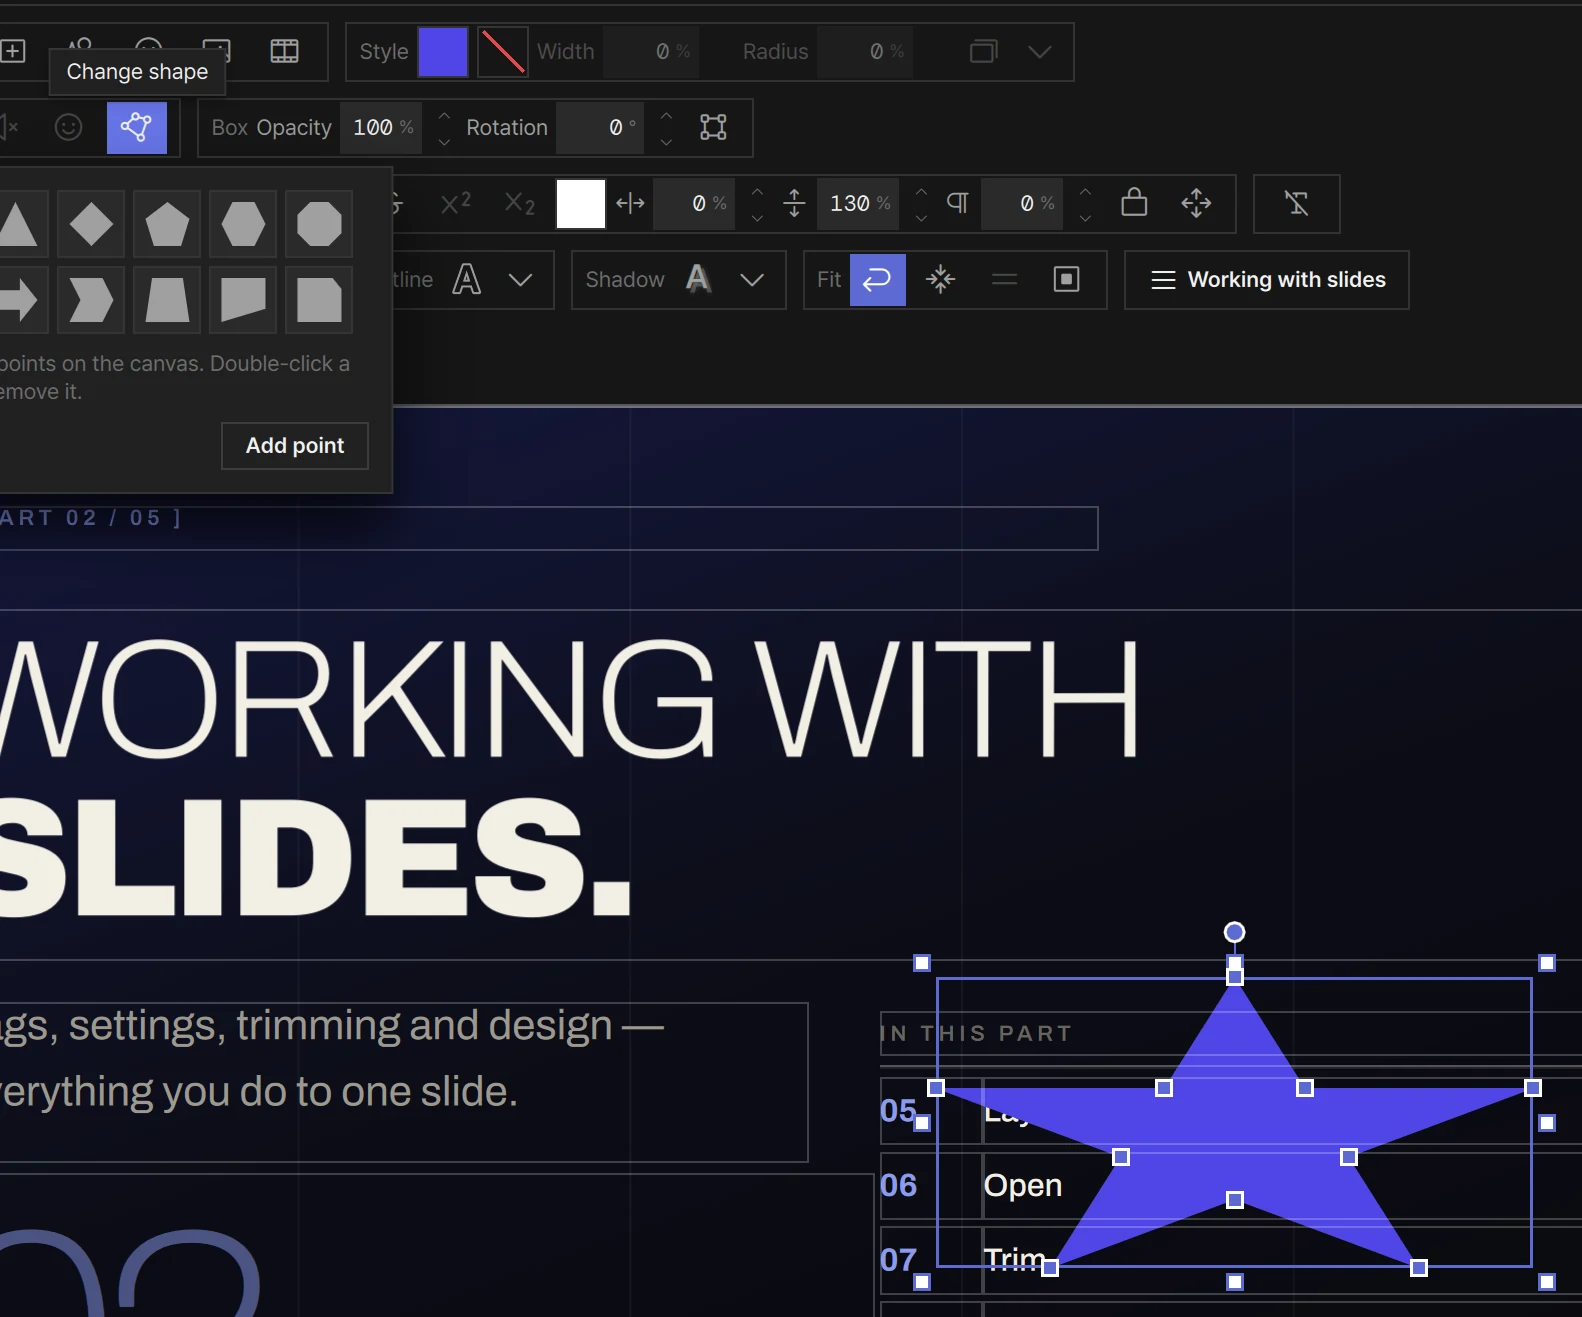
Section titled “Change shape”Change shape in the Change group turns a selected rectangle or text box into another shape. It does not work on ellipses, icons or pictures.
- Pick a shape in the grid and the box is cut into that shape
- Small filled indigo squares appear on the corner points (the white squares around the box are its size handles). Drag one to move it; double-click a point to remove it
- Add point puts a new point in the middle of the longest edge, up to 16 points (and never fewer than 3)
- Rectangle (no polygon) turns it back into a plain box
A box cut into a shape keeps its fill and its border, and the border follows the new edges. The text inside is never cut off by the shape — it stays whole even where it crosses an edge. A shape like this has no rounded corners and no box shadow.
Insert icon opens a search field with about 1,500 icons. With the field empty you see the
common ones first. Type a word — Search 1,500+ icons (cross, arrow…) — and press Return /
Enter to place the first match, or click the one you want. Korean and Japanese words find icons too,
whatever language the app is in.
A new icon comes out dark when the slide’s background colour is bright, and white otherwise, so you can see it straight away.
- Its colour is the Text color in ribbon row 3
- It grows and shrinks with its box (The icon grows with its box.)
- To swap it for another, double-click it, or press Change icon in the Change group
- Solid in the Change icon picker switches it to the filled style
Pictures
Section titled “Pictures”| Way in | Where it lands |
|---|---|
| Add picture in the Insert group | the middle of the slide |
⌘V / Ctrl+V with a picture on the clipboard |
the middle of the slide (Added the picture) |
| Drag picture files from the Finder / File Explorer onto the canvas | where you drop them |
A picture becomes a picture box that keeps the photo’s own proportions. Portrait photos from a phone stand the right way up, and photos with a colour profile — CMYK files made for print, Display P3 or Adobe RGB — show in their true colours. LayerCue copies the file into its own media folder, so moving or deleting the original does not break the slide (see Where your files live).
Dropping something that is neither a picture nor a video shows Only picture (.png, .jpg, .svg …) or video files can be dropped here — a video file becomes a video box. A file that cannot be read shows This picture cannot be used.
Drag a corner handle and the proportions hold; hold Shift to stretch freely.
With a picture selected, the Change group decides how it fills its box:
| Button | What it does |
|---|---|
| Fill | covers the whole box; what sticks out is cropped. New pictures start here |
| Stretch | stretches to the box, proportions or not |
| Fit | shows the whole picture, with empty space where the shapes differ |
| Fill the slide | makes the box cover the whole slide, set to Fill |
| Set as background | turns the picture into the slide’s background: it fills the slide under everything and can’t be picked up on the canvas any more. Its fit carries over; a background picture or video the slide already had is replaced |
Set as background is in the box’s right-click menu too.
Videos
Section titled “Videos”Add video in the Insert group, Add video… in the canvas’s right-click menu, or a video file dragged from the Finder / File Explorer onto the canvas puts a video in a video box: a 16:9 box in the middle of the slide — or where you right-clicked or dropped — on top of the other boxes. Move it, resize it and put it in order like any box; its corners keep the proportions. Double-click it to open Crop and fit video. The file is copied into the media folder, as a picture is.
A slide holds up to four videos, and they all play together when the slide goes out (Up to 4 videos per slide). Videos can’t go on a YouTube or web slide (Videos can’t be added to a YouTube or web slide).
| The slide’s video | Added videos | |
|---|---|---|
| Which one | The first video on the slide — the one a video slide has always had | Every video after the first; each box has a file of its own |
| Sound | Slide volume in Slide settings | On to start with. The speaker button in Change turns it off and on again (Sound on — click to mute) |
| Repeat | Repeat in Slide settings | The repeat button in Change — Play once to start with, or Loop |
| Fit · crop · Anchor | The slide’s own — in Slide settings, or with the fit buttons and Crop and fit video in Change | The box’s own — the fit buttons in Change, and Crop and fit video, which opens the same sheet titled Video box settings |
| In and Out points · speed | In Slide settings | None — it plays from the start |
| On stage | The progress bar and ▶ under the preview work on it | It starts with the slide; ▶ / ❚❚ pause and play it together with the slide’s video |
The fit buttons for a video include Fit + blur bg, which fills the rest of the box with a blurred copy of the video (not for a streaming YouTube). A video that plays to its end without repeating stays on its last frame.
Sound is on to start with. After you add a second video, LayerCue reminds you: Video box added — mute it with the speaker button under Change. With several videos on one slide, every one of them is heard unless you turn some off.
A video box takes no fill, border, rounded corners or shadow — the Style group is dimmed, and its tooltip says Video boxes have no fill, outline or shadow — fit, crop, repeat and sound are under Change.
- Copy and duplicate work as for any box, up to four videos per slide. A copy of the slide’s video
becomes an added video with the same file. The slide’s video itself can’t be cut; delete it with
Deleteand the video leaves the slide — the added ones stay. - Set as background video, in Change or the box’s right-click menu, lays the video under the whole slide as its background. That usually makes it a background slide, and the video then loops and starts silent, as backgrounds do. Make it a video box in the Background row does the reverse. An added video can become the background only on a slide with no picture or video of its own.
- If the slide had a background picture when you added its first video, the picture moves into a box at the very bottom, so the slide looks the same (its crop does not carry over).
A streaming YouTube can sit in a video box too: press Make it a video box in the Background row. It plays in that box with text and shapes around it, but it can’t be cropped or given a blurred margin, and there is one at a time. See YouTube.
SVG drawings
Section titled “SVG drawings”An SVG is a drawing made of lines and shapes, so it stays sharp at any size. Three ways in:
- Copy the SVG code and paste it with
⌘V/Ctrl+V - Add picture and choose an
.svgfile - Drag an
.svgfile onto the canvas
The drawing is kept inside the slide itself — there is no file to lose. Parts of the drawing that
use currentColor take the box’s Text color from ribbon row 3 (white to start), so you can recolour them.
LayerCue cleans what it takes in. Scripts, event handlers, links to outside addresses and embedded pictures are removed, and you see Pasted the drawing (outside links and scripts removed). Filters, masks, blend modes and animation are not drawn.
Some drawings are refused with This SVG cannot be used — it holds text or is too big:
- it contains text (words belong in a text box, where you can edit and search them)
- it is larger than 64 KB, or has more than 2,000 elements
- it has no size — neither a
viewBoxnor a width and height
Fill and gradients
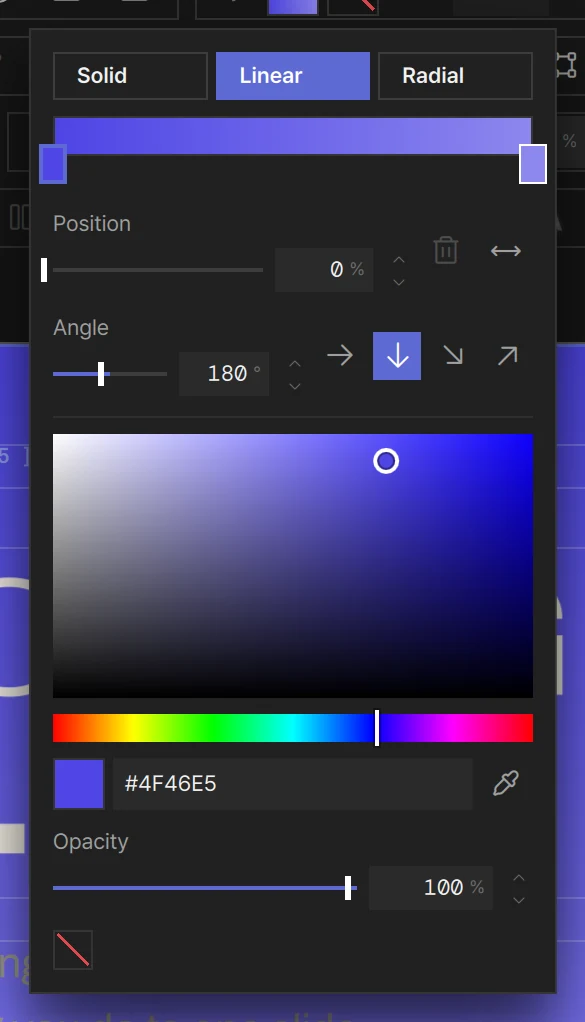
Section titled “Fill and gradients”Press the Fill chip in the Style group. Across the top you choose Solid, Linear or Radial.
| Kind | What it is |
|---|---|
| Solid | one colour. Its Opacity is in the colour picker, and No fill clears it |
| Linear | colours that run in a straight line |
| Radial | colours that spread out from a centre |
Switching from Solid to a gradient starts you off with your colour and a lighter or darker shade of it. Switching back keeps the first colour.
On a gradient:
- The band shows your colours in order. Click an empty spot on the band to add a colour (up to four), and drag a handle to move it
- Click a handle to choose that colour, then change it in the colour picker below. Each colour has its own Opacity, and the No fill swatch makes the chosen colour transparent (Make this colour transparent (no colour)) — for a gradient that fades away to nothing
- Position moves the chosen colour along the band, Remove this color takes it out (two always stay), Reverse colors flips the order
- Linear — Angle, plus four buttons for common directions. The arrow on each button points the way the colours run
- Radial — X and Y move the centre. RX and RY set the size as a % of the box; make them different for an ellipse. Back to a circle undoes that
Text boxes, shapes, icons, pictures and SVG drawings can all take a gradient; lines and video boxes cannot. The colour chip in the Background row under the canvas opens the same picker for the slide’s own background.
Border and corners
Section titled “Border and corners”| Field | What it does |
|---|---|
| Border color | the colour of the border. Picking one on a box with no border gives it a thin one straight away |
| Width | border width, % of screen height. Works once a border colour is set |
| Radius | how round the corners are, % of screen height. Not for ellipses or polygon shapes |
Pictures take a border and rounded corners too — the picture is rounded off to match.
Box shadow
Section titled “Box shadow”There are two shadows in the editor. Box shadow in the Style group falls behind the whole box. Text shadow (the Shadow group in ribbon row 4) falls behind the letters only.
Press Box shadow to turn it on. The ▾ next to it (Box shadow options) holds:
| Value | Starts at |
|---|---|
| Distance | 1.2% |
| Angle | 90° — straight down. 0° is to the right and it turns clockwise |
| Blur | 3% |
| Spread — grows or shrinks the shadow on every side | 0 |
| Shadow color | black at 45% |
Distance, blur and spread are % of screen height, so the shadow keeps its look on any screen. The shadow shows only outside the box — a see-through box is not darkened inside. Lowering the box’s Opacity fades its shadow with it.
The Box group
Section titled “The Box group”Opacity fades the whole object, text and shadow included, from 10 to 100%.
Rotation turns the box from −180° to 180°. You can also drag the round handle above a selected
box; hold Shift and it turns in 15° steps.
Place opens a popover:
- Position — X and Y, then W and H, all as a % of the slide. X and Y run from −100 to 200, so a box can hang off the edge
- With several boxes selected, the numbers are for the group as a whole, and changing them moves or resizes the group together
- At the bottom, the stacking order buttons (see below)
Lining boxes up
Section titled “Lining boxes up”The box buttons sit in the Align group in ribbon row 4, after the buttons that align text inside its box.
| Button | What it does |
|---|---|
| Align across | opens three buttons: left, centre, right |
| Align down | opens three buttons: top, middle, bottom |
| Center on the slide | sends the box to the middle of the slide |
| Distribute H · Distribute V | spaces the selected boxes evenly |
| Snap guides (the magnet) | boxes stick to edges, centres and each other as you drag |
One box lines up with the slide; several boxes line up with each other. With several selected, Center on the slide moves them as a group and keeps their layout. Boxes go flush to the edge with no margin, so drag them afterwards if you want one. A rotated box is lined up by the shape you see.
Distribute needs three or more boxes selected (Select three or more to distribute). The two outer boxes stay where they are and the gaps between all of them become equal.
Stacking order
Section titled “Stacking order”When boxes overlap, the order decides which one is on top.
| Command | Key |
|---|---|
| To front | ⇧⌘] / Ctrl+Shift+] |
| Forward | ⌘] / Ctrl+] |
| Backward | ⌘[ / Ctrl+[ |
| To back | ⇧⌘[ / Ctrl+Shift+[ |
The same commands are under right-click → Order, and at the bottom of Place. Several selected boxes move as one block and keep their order among themselves. Nothing goes behind the slide’s background box.
To reach a box hidden under another: Option-click / Alt-click it (each click goes one box deeper),
press Tab to step through the boxes (Shift+Tab goes back), or right-click → Select overlapping and pick it from the list.
Box roles
Section titled “Box roles”Right-click a box → Role tells LayerCue what the box is for on a designed slide. It matters on slides with more than one text box.
| Role | What it means |
|---|---|
| Slide text (lyrics, body) | the box that takes the words — when you split and merge slides, and when an AI app writes a slide’s text |
| Title | the slide’s name on its card comes from the first line of this box |
| Decoration (skipped by text fill and bulk style) | headers, badges, ornaments. The slide’s words are not filled in here, and pasting a style onto many slides leaves it alone |
| Backdrop | a box that covers the slide as its background. Pasting a style onto many slides leaves it alone too |
| None | no role. On a slide with no roles, the first text box takes the words |
Slide text and Title are for text boxes only. After you choose, Role: … appears.
AI-made artwork
Section titled “AI-made artwork”When an AI app designs an effect LayerCue cannot draw itself — glass or blur, for example — that part arrives as a picture box. On such a box the Style buttons and the fit buttons are dimmed; only its position, size, opacity and rotation change.
When a button does nothing
Section titled “When a button does nothing”If Editing is locked while presenting appears, editing is locked. If Lock editing while live is on in Settings, LayerCue locks it the first time a slide goes out while an output window is open, and you can lock it yourself with the padlock in the status bar. Press the padlock (Unlock editing), then make your change.
For typing, fonts, outlines and the Background row, see The slide editor. For every key in one place, see Keyboard shortcuts.