The main window
The window has four parts. Read it in this order: pick on the left, click in the middle, watch the top, adjust on the right.
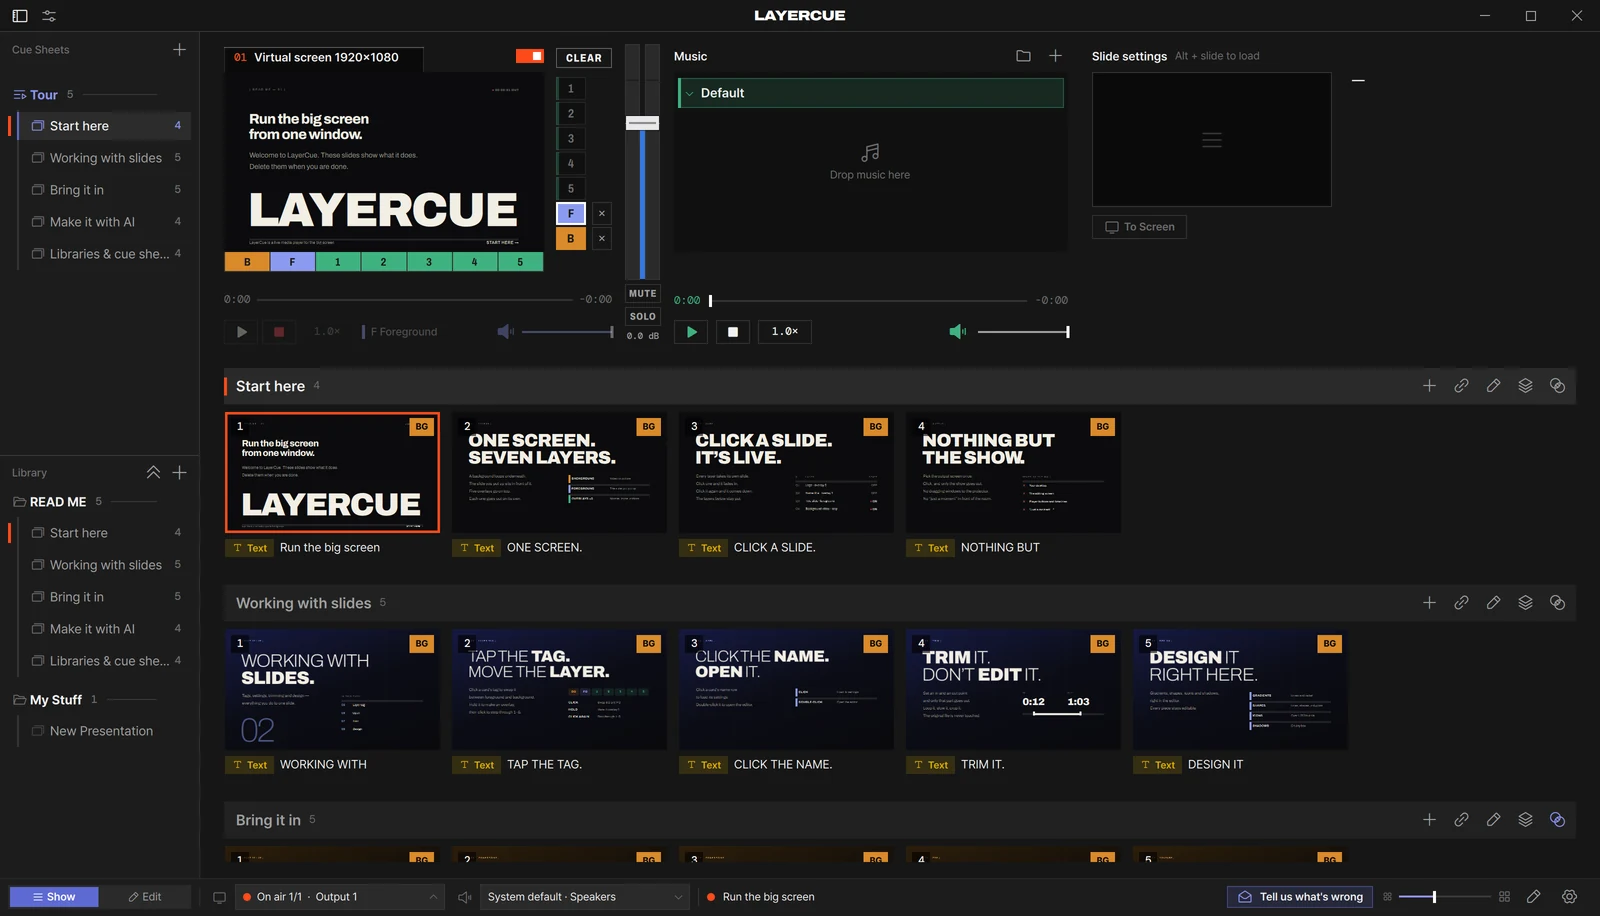
| Where | What is there |
|---|---|
| Left | The sidebar — Cue Sheets at the top, the Library drawer below |
| Middle | The slides of whatever you picked, in running order |
| Top | The monitor tile — a preview of what goes out, with its layer column and power switch — then the sound meter, Music and Slide settings |
| Bottom | The status bar — Show / Edit, what is on air, the sound device, settings |
Left — cue sheets and the library
Section titled “Left — cue sheets and the library”Three kinds of thing live in the sidebar.
| Presentation (two stacked cards) | One set of slides — a song, a sermon, the announcements. The number beside it is how many slides it has |
| Library (a folder that opens and closes) | A collection of presentations. Every presentation lives in one library |
| Cue sheet (a list icon) | The running order for one event. It points to presentations in your libraries rather than copying them, so the same song can sit in several cue sheets |
Cue Sheets take the top of the sidebar, because that is what you reach for during the event. The Library is a flat drawer across the bottom, under a thin line. Press the double arrow at its top right (Library) to pull it up over most of the sidebar, and press it again to lower it. Pointing at it does not raise it.
To make something new, press the + beside a heading (Add):
- beside Cue Sheets — New Cue Sheet or New Presentation
- on the Library drawer — New Library or New Presentation
Point at a library row and a + appears on it too. It starts a new presentation in that library.
| Click a library or a cue sheet | Opens or closes it |
| Click a presentation in a library | The middle shows that one presentation |
| Click a presentation inside a cue sheet | The middle shows the whole cue sheet, scrolled to that presentation |
| Drag a presentation onto a library | Moves it to that library |
| Drag a presentation onto a cue sheet | Adds it to the cue sheet. It stays in its library as well |
| Right-click a presentation in a library | Rename, Presentation settings, Add to Cue Sheet, Move to Library, Export to PDF… and more |
When you drag a presentation up out of the Library drawer, the drawer drops out of the way so you can reach the cue sheets.
The row you picked is lighter, with a thin indigo bar at its left. A short orange bar at the left of a row marks the presentation that has something on stage right now. The same bar sits on its title bar in the middle, so you can find it with the sidebar hidden.
More in Libraries and cue sheets.
Middle — the slides
Section titled “Middle — the slides”Pick a presentation in a library and you see that presentation. Pick one inside a cue sheet and you see every presentation in the cue sheet, one after another, each under its own title bar — a filled bar with its name and how many slides it has. That order is the running order.
The buttons at the right of each title bar:
| + (Add File) | Videos, pictures, sound files, PowerPoint and PDF |
| Chain (Link) | Paste a YouTube address |
| Pencil (Edit) | Opens the slide editor, where you make text slides |
| Stacked sheets (Layer for this list) | Puts every slide of this presentation on one layer |
| Two overlapping circles (Presentation settings) | Crossfade, Fade out and Auto-dismiss for this presentation |
You can also drag files in from the Finder / File Explorer — between a presentation’s cards, onto its title bar (they go at its end), or into the empty space below the last presentation (they go at the end of that one).
A click on a slide’s picture sends it out on the spot. No confirmation, no second step.
| Click the picture | Sends it out |
| Double-click the picture | Sends it out from the beginning again |
| Click the name under the picture, or Option-click / Alt-click | Loads it into Slide settings only. Nothing goes out |
| Double-click the name | Opens it in the slide editor |
⌘-click / Ctrl-click, Shift-click |
Selects several |
| Drag from an empty spot — between or beside the cards | Draws a box and selects every card it touches. Hold Shift or ⌘ / Ctrl to add to the selection |
| Right-click | The slide’s menu |
The slide that is out has an orange border. The one you selected has an indigo border.
Clicking a slide that is already out does nothing — it stays up. That is deliberate: a stray
second click on stage should not take anything down. To take things down, use CLEAR and the
× in the layer column described below, or F1–F4 (⌘1–⌘4 / Ctrl+1–Ctrl+4): F1
every layer, F2 the foreground, F3 the background, F4 the overlays.
Drag slides to reorder them. Drag them onto another presentation and they are copied; hold Option / Alt as you drop and they are moved instead. A badge on the dragged picture says which it will be.
More in Slides.
Top — the stage
Section titled “Top — the stage”The band across the top reads from left to right: the monitor tile of Output 1, the meter, Music, and Slide settings. With more than one output, a second monitor tile stands next to the first.
The monitor tile
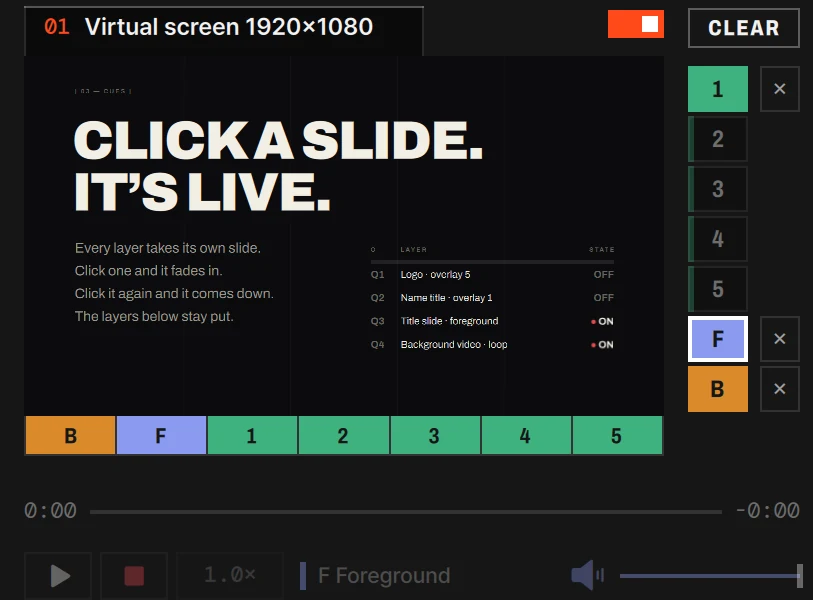
Section titled “The monitor tile”The tile shows what goes out to one monitor, and lets you switch that monitor on and off.
The header. On the left is a tab with the output’s number — 01 — and its name: the name you gave it, or else the name of its screen (Output 1 once there is more than one output). The number is orange while that monitor is on air and dim while it is off. Click the tab for a small panel where you type a name (audience, stage, lobby …) and choose its Screen. Further right, the header shows the screen’s name and size when the tab does not already, not connected in orange if the monitor is switched on but its screen is unplugged, and Pick a screen while no screen is chosen for it.
The power switch at the right end of the header is that monitor’s output window. Switch it on and the window opens on that screen at once — black while nothing is up. Switch it off and the window goes away, and the screen shows its desktop again. Its tooltip reads Stop Output while it is on and Output while it is off. LayerCue remembers the switch: next time, the output opens by itself once the app is ready. The exception is the screen the LayerCue window is on: a monitor set to it starts switched off, and covers that screen only when you flip the switch yourself.
The preview has the same shape as that screen. Anything on stage shows here even while the monitor is switched off, so you can see what will go out before you switch on. With nothing on stage it is black while the monitor is on, and shows a monitor icon while it is off.
Layers shown. Right under the preview is a strip of seven cells — B, F, 1–5. It decides which layers this monitor shows. A cell filled with its layer’s colour is shown; click it to leave that layer off this monitor, and click again to bring it back. Point at a cell to see the layer’s name. Turning a layer off here does not take it down — it stays on stage and on the other monitors.
The layer column, to the right of the preview, is for the whole stage:
| CLEAR at the top | Clear All — takes every layer down. Dim when there is nothing to clear |
| 1–5, F, B | The five overlays, the foreground and the background, in stacking order. A layer’s cell fills with its colour while something is on it — indigo for the foreground, amber for the background, green for the overlays |
| × beside a filled cell | Clear this layer — takes that one layer down |
| White outline | The layer the controls below are working on. Click another filled cell to switch |
The controls at the bottom of the tile act on that one layer: the progress bar, play / pause, the red ■, playback speed, then a short bar in the layer’s colour with its name, and at the right end the mute button and volume. The red ■ takes down only the video on that layer; to take everything down, use CLEAR.
Esc never switches a monitor off. Use its power switch, or the round ✕ that appears at the top
right of the output screen when you move the mouse over it.
More than one monitor
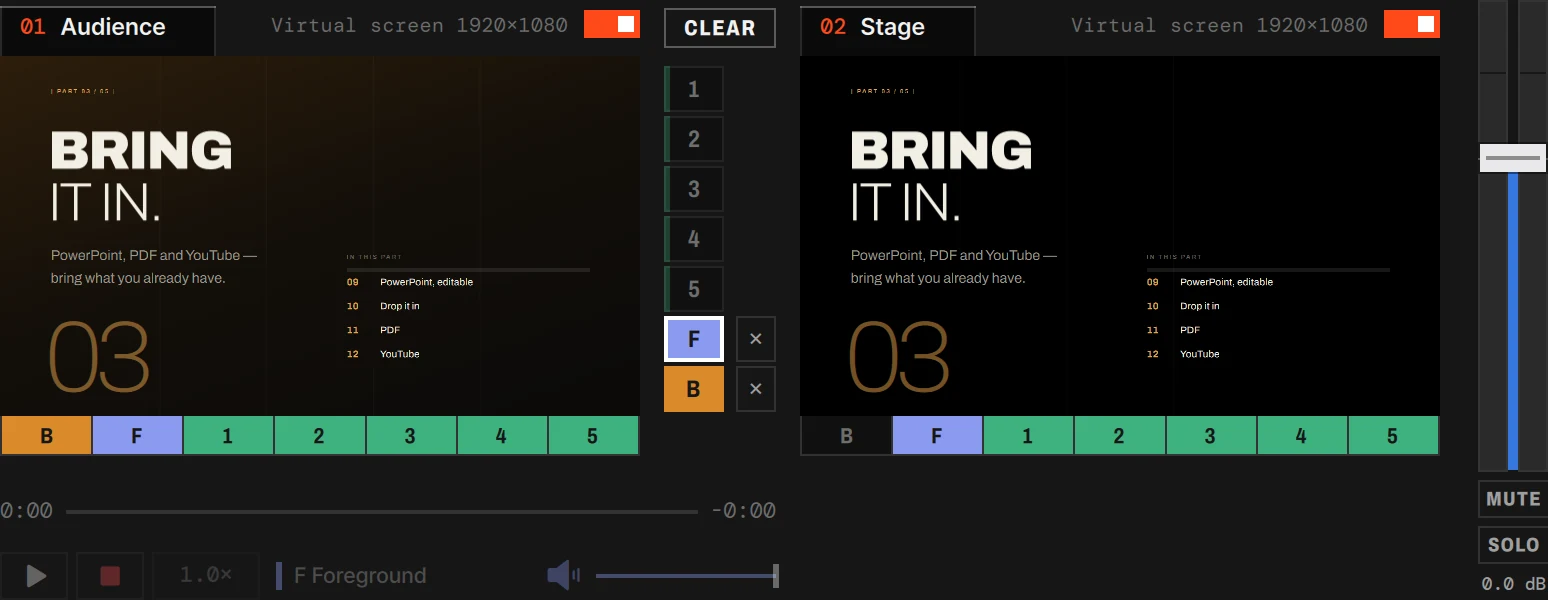
Section titled “More than one monitor”Add monitors in Settings › Stage › Output monitors (Add monitor). With a second output, a second tile stands next to the first: a header with its tab and power switch, a preview at that monitor’s shape, and its own Layers shown strip — so the room can see everything while a stage monitor shows the words without the background. The layer column and the controls stay with Output 1: every monitor shows the same stage. With three or more outputs, the second tile has a tab for each output from 02 on (02, 03 …); click one to show that output there.
More in Multi-Output.
The meter
Section titled “The meter”Next to the monitor tiles stands a meter for the sound going out. The master volume rides on top of it, and it has two buttons, MUTE (Mute all) and SOLO. See Sound and the meter.
Background music has its own panel and its own channel, so it keeps playing while you change slides. Bring tracks in with Add folder and Add music, or drop them on the panel. Click a track to play it; ■ stops it. Point at a track and press its sliders button (Track settings) to adjust it on the right. See Music.
Slide settings
Section titled “Slide settings”This panel shows the slide you loaded into it — by clicking a slide’s name, or with Option-click / Alt-click. Next to its heading it says Option + slide to load on a Mac and Alt + slide to load on Windows: a reminder that a plain click sends a slide out, so load it this way when you only want to look.
What you set here is saved on that one slide. Set it once and that slide always goes out that way.
- Four buttons for how it fills the screen — Fill, Stretch, Fit, Fit + blur bg (point at one for its name). A streaming YouTube has the first three
- The gear at the top right of the picture opens Crop & fit. On a text slide that corner holds a pencil instead, which opens the slide editor
- For video, YouTube and sound: In point, Out point (Clear In/Out removes both), playback speed, repeat and volume
- To Screen under the picture puts the slide on the screen
Open a track’s settings in Music and the same panel becomes Track settings. More in Slide settings.
Bottom — the status bar
Section titled “Bottom — the status bar”From left to right:
| Show / Edit | Running the show, or the slide editor |
| Presentation picker | Shows up when the sidebar is hidden, and in Edit. Jump to another presentation from here |
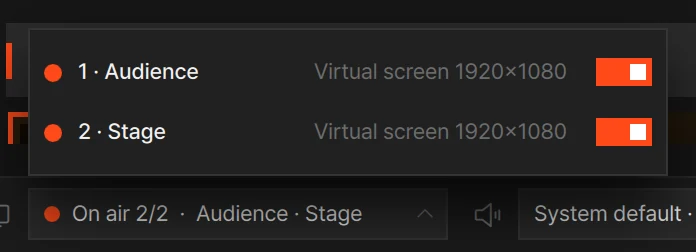
| Monitor icon and on-air chip | On air 1/2 · Audience · Stage — how many of the monitors you switched on are showing, and their names (a monitor on a virtual screen counts) — or No output. The dot is orange while all of them are showing, an orange ring while only some are, grey while none is. Click it for a list of the outputs, each with its screen and power switch |
| Speaker icon and device | Where the sound goes |
| Dot and stage title | What is on stage: the title of the slide that is up — the foreground’s first, then the background’s, then an overlay’s — On stage when none of them has a title, or Stage clear when nothing is up. The dot is orange while something is up and a monitor is on air, grey while something is up but no monitor is, and faint while the stage is clear. The title shows in a wide window only; the dot is always there |
| Tell us what’s wrong | Send us a note |
| Slider | Slide card size. Bigger cards mean fewer mis-clicks in a dark booth |
| Pencil / lock (Lock editing / Unlock editing) | Locks the slides against accidental changes during the show. Sending slides out still works |
| Update | On a Mac, appears when a new version is out. On Windows, updates come from the Microsoft Store |
| Wrench (Tool update) | A newer version of the tool LayerCue uses for YouTube. Opens Settings › Tools |
| Gear (Settings) | Settings |
Edit — the slide editor
Section titled “Edit — the slide editor”Press Edit in the status bar — or the pencil on a presentation’s title bar, or double-click a slide’s name — and the window becomes the slide editor for that presentation: its slides in a strip down the left, and the slide itself, large, with the tools above it. The sidebar and the top band step aside while you edit. Press Show to come back.
See The slide editor.
Layers
Section titled “Layers”A slide does not go out as one flat sheet. The stage has seven layers, stacked in the same order as the layer column beside the preview:
1 Overlay top2 Overlay3 Overlay4 Overlay5 Overlay just above the foregroundF ForegroundB Background bottomEach layer goes up and comes down on its own. Change the foreground slide and the background and the overlays stay where they are. Slides go to the foreground unless you set them otherwise; a colored chip on a slide’s card shows when it is set to the background or an overlay. A slide whose background you set in the editor’s background row — the READ ME slides are like this — goes out in two parts: its background on B, its words and boxes on F. (Sound files go to the music channel, not to a layer.)
You can name the overlays in Settings › Overlay names, so in a hurry you look for “Logo” instead of a number. See Layers.
When the window gets narrow
Section titled “When the window gets narrow”LayerCue is made to work on one laptop. Narrow the window and things fold away in this order:
| What happens | |
|---|---|
| Wide | Everything shows |
| Narrower | Slide settings folds into a short summary at the right end of the band |
| Narrower still | Music folds into the summary too |
| Narrower again | The sidebar folds away, and the presentation picker appears in the status bar |
| Narrowest | The monitor tiles, the meter and the summary — these never fold |
The summary keeps the basics within reach. For Slide settings: the slide’s name, its kind and format, the four fit buttons and Crop & fit (the pencil, on a text slide) — or Option + slide to load / Alt + slide to load while nothing is loaded. For Music, at the bottom: the track’s name and the time left (Nothing playing when there is none), play / pause, stop, mute and volume.
Click the heading of either part — Slide settings or Music, with an arrow (Open in a window) — and the whole panel opens as its own window beside the app. Nothing pops out by itself. Widen the app until the panel fits and it goes back into the band, and the window goes away.
The status bar makes room as well: the on-air chip and the sound device shorten, the stage title drops out (its dot stays), and Tell us what’s wrong shrinks to just its envelope.
Two buttons sit in the title bar — on a Mac just right of the traffic lights, on Windows at the left end. The first shows or hides the sidebar; the second (Slide settings) brings Slide settings and Music back into the band. If there is no room, each widens the window by just enough for what you asked for, not to full size.