The slide editor
The editor is where you make text slides — lyrics, Bible verses, titles, running orders, name captions — and where you put text on any other slide. Text boxes sit on picture and video slides too.
This page covers opening the editor, writing and formatting text, making it fit, and the slide’s background. Shapes, icons, pictures, videos, fills, box shadows and arranging boxes are in Design tools.
Opening and closing the editor
Section titled “Opening and closing the editor”| Way in | Slide that opens |
|---|---|
| Edit on the Show / Edit switch at the bottom left of the window | The slide you picked last in the presentation you are looking at |
| The pencil (Edit) on a presentation’s title bar | The slide you picked last in that presentation |
| Right-click a presentation in the sidebar → Edit | The same |
| Double-click the name strip under a slide card’s picture | That slide |
| Right-click a slide card → Edit | That slide |
| The pencil at the top right of the picture in the Slide settings panel, when a text slide is selected | That slide |
If the presentation has no slides yet, a new text slide is made for you.
The editor takes over the window: the sidebar and the area at the top step aside, and the bar along the bottom stays. A presentation picker appears in that bar beside Show / Edit, and there is another at the right end of the ribbon, so you can jump to another presentation without leaving the editor. Presentations are grouped by library in both.
To leave, press Show, or press Esc until the editor closes.
Whatever you changed is saved, however you leave — there is no Save button.
The editor window
Section titled “The editor window”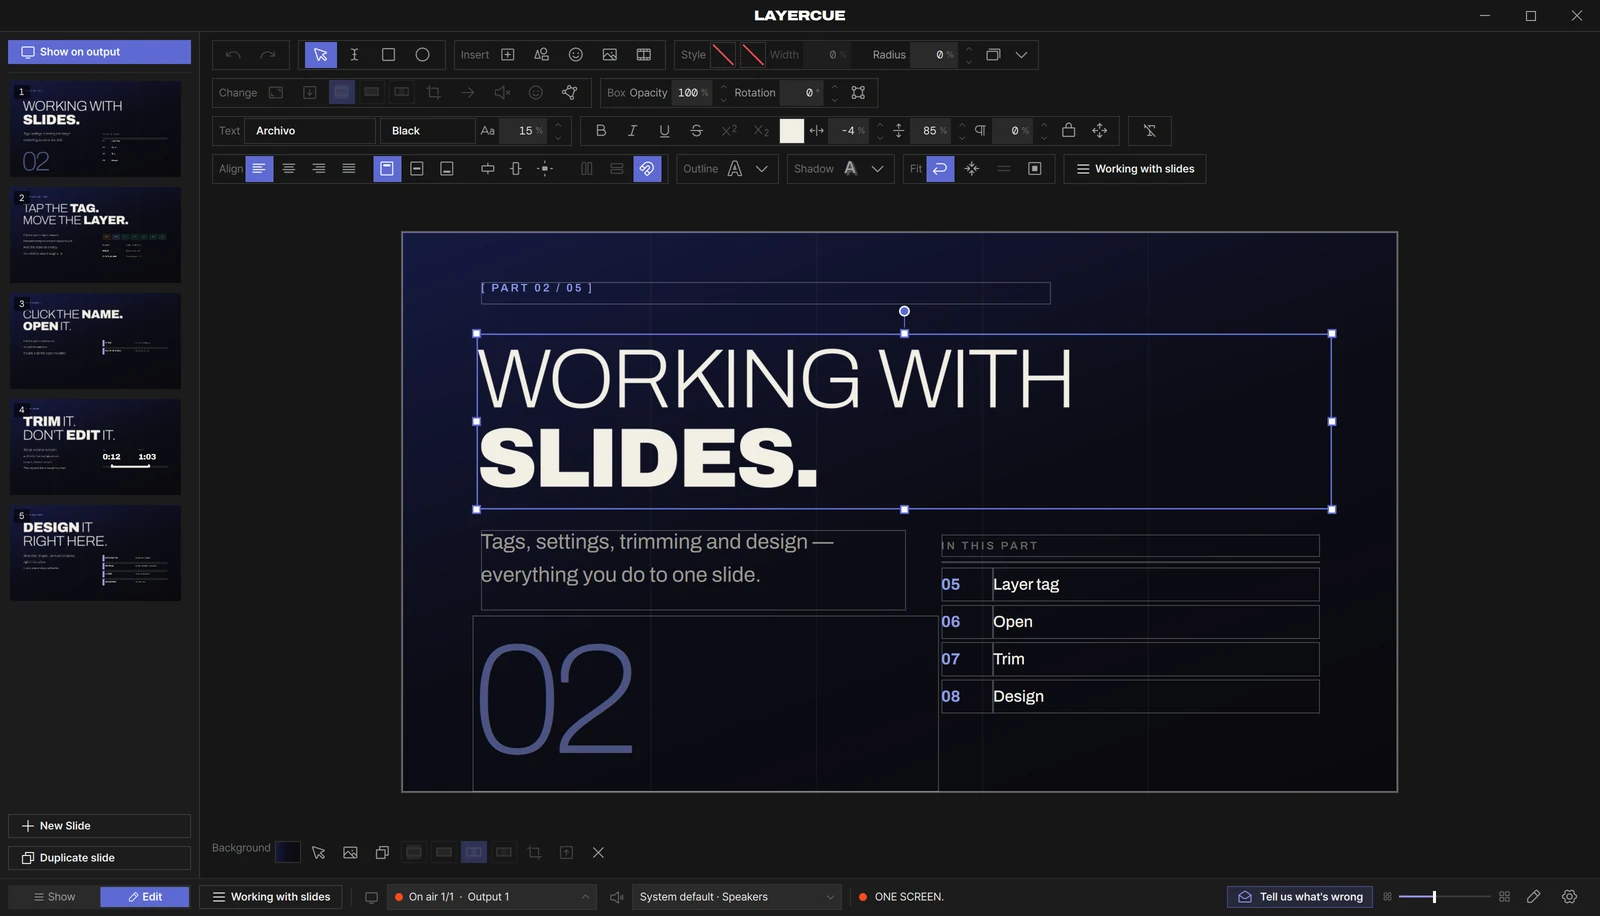
| Area | What is there |
|---|---|
| Left column | Show on output at the top, every slide in this presentation, New Slide and Duplicate slide at the bottom |
| Top | The ribbon — four rows |
| Middle | The canvas — the slide, in the same shape as the output screen, with a work area around it |
| Under the canvas | The Background row |
| Ribbon row | Groups |
|---|---|
| 1 | Undo · Redo · tools (Select · Text · Rectangle · Ellipse) · Insert · Style — making things and how they look |
| 2 | Change · Box — working on the box you selected |
| 3 | Text — font, weight, Font size · bold, italic, underline, strikethrough, superscript, subscript, Text color, spacing, Glyph scale · Clear formatting |
| 4 | Align · Outline · Shadow · Fit · the presentation picker |
Hover any button for its name. Group names stay the same whatever you select, and when the window is narrow a row wraps between groups. Rows 3 and 4 grey out when a picture, a video or a line is selected — hover them and they say Applies only to boxes that hold text (text boxes, shapes, icons). The Insert, Style, Change and Box groups are explained in Design tools.
The slide sits in a darker work area. The part of a box that hangs off the slide shows there dimmed — it does not go to the stage. Click the work area to clear the selection.
Slides in the left column
Section titled “Slides in the left column”Click a slide and it opens on the canvas. ⌘-click / Ctrl-click adds or removes one slide,
and Shift-click picks everything up to it. Picking several does not change the slide you are
editing — that selection is for acting on several slides at once. The slide you are editing
has a border; the others you picked get a blue tint.
- New Slide adds an empty text slide at the end, with one empty text box.
- Duplicate slide puts a copy right after the slide you are editing.
Right-click a slide for Duplicate slide · Split into slides · Merge with previous ·
Delete slide. With three picked, for example, they become Duplicate 3 · Merge 3 into one ·
Delete 3. Deleting does not ask — ⌘Z / Ctrl+Z brings the slides back.
After you click in the column, keys act on slides instead of boxes:
| Key | What it does |
|---|---|
↑ ↓ |
Open the slide above or below |
Delete or Backspace |
Delete the slide (or every picked slide) |
⌘D / Ctrl+D |
Duplicate the slide |
⌘C · ⌘X · ⌘V / Ctrl+C · Ctrl+X · Ctrl+V |
Copy, cut and paste slides — pasted slides go after the one you are editing |
⌘A / Ctrl+A |
Pick every slide |
Click the canvas and the keys go back to working on boxes.
A text slide is named after its text: the first line, up to 40 characters, of its Title box if it has one, otherwise of the box that holds the slide text. Edit the text and the name follows. A slide with no text is called New slide. Roles such as Title are in Design tools.
Adding a text box
Section titled “Adding a text box”| Way | Where it lands |
|---|---|
| Add text box in the Insert group | In the middle of the slide |
| Pick the Text tool and click | Centred where you clicked |
| Pick the Text tool and drag | The box you drew |
| Right-click an empty spot → Add text box | Centred where you right-clicked |
On an empty slide a new box covers 80% × 80% of the slide. When the slide already has something on it, the box is caption-sized — 60% wide and 16% high — so it does not cover what is underneath.
You can type into it straight away. If you leave a new box without typing or changing anything, it goes away again. An empty text box shows the word Text on the canvas so you can find it; that word never goes to the stage.
While the Text tool is held, a line above the slide says Click to place a text box · drag to size it · Esc to cancel. After one box the Select tool comes back on its own. Click an existing text box with the Text tool and you are typing in it; click a picture or a shape with it and a new text box goes on top.
Rectangle and Ellipse draw shapes the same way, and shapes can hold text too — see Design tools.
Typing
Section titled “Typing”| To start typing | The cursor lands |
|---|---|
| Double-click a text box | On the word you double-clicked, which is selected |
Select a box and press Return / Enter |
At the end of the text |
| Click a text box with the Text tool | On the word you clicked |
Rectangles and ellipses take text the same way. Double-clicking an icon opens its picker instead, and double-clicking a video box opens Crop and fit video; pictures and SVG drawings hold no text.
While you type, the letters already look finished — outline, shadow, spacing and all — so
what you see is what goes out. Esc ends typing, and so does clicking somewhere else.
Formatting text
Section titled “Formatting text”The ribbon shows the values of the selected box. A change goes to every selected box. To change only one, click it on its own — clicking one box of a selection, without dragging, leaves only that one selected.
The font list
Section titled “The font list”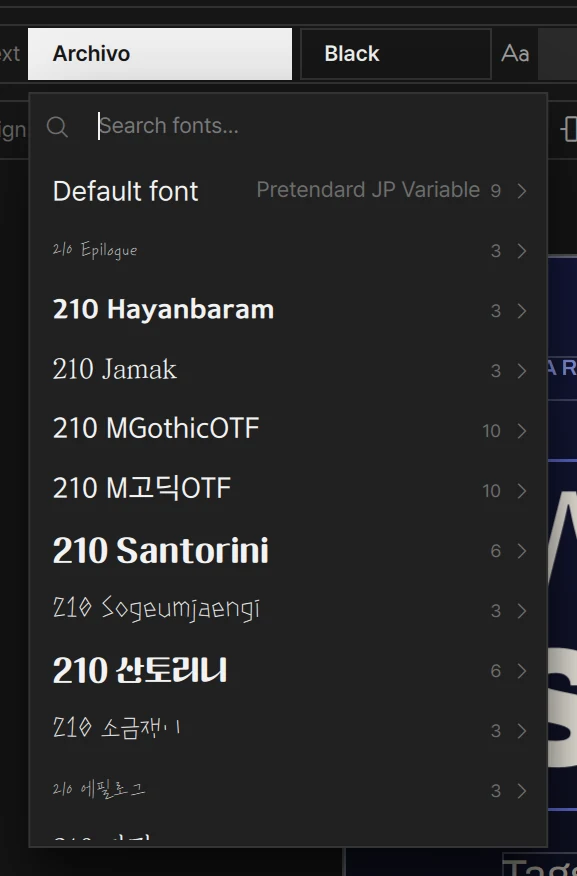
Click the font field and the list opens with Search fonts… at the top.
- Search by any part of the name. Capitals and spaces do not matter, and a font’s name in your computer’s language works as well as its English one. Korean initial consonants work too.
- With the search empty, Recent shows the last five fonts you picked, then All fonts lists everything. Fonts that include Korean letters come first.
- Default font heads All fonts, with its real name beside it: Pretendard JP, the font that comes with LayerCue.
- A font with several weights shows a number and an arrow. Hover it and its weights open to the right, so you pick the font and the weight in one go. Pick just the name and you get the weight closest to the one you had. The field beside the font changes the weight on its own.
A font you install while LayerCue is open appears in the list after you restart LayerCue. A slide that uses a font this computer does not have is drawn in Pretendard JP.
Size and spacing
Section titled “Size and spacing”Every number field works the same way:
- Drag its label or icon left and right
- Click the number — a slider opens, and you can type the value there
- The small up and down arrows beside it, or the mouse wheel
- Hold
Shiftfor steps ten times bigger,Option/Altfor ten times smaller
While you drag, only the screen changes. The value is saved once when you let go, and that is one step of undo.
| Field | Measured in | Range |
|---|---|---|
| Font size | % of screen height | 1–80 |
| Tracking — space between letters | % of font size | −60 to 200 |
| Line height | %. 100 is the font’s own spacing; below 100 pulls the lines closer | 20–500 |
Paragraph spacing — extra space where you pressed Return / Enter |
% of font size | 0–300 |
| Glyph scale → Width scale · Height scale — stretches the letters themselves | % of the letter’s own shape | 10–400 |
Exact line spacing gives every line in the box the same height, even when the text mixes sizes.
Because size is a share of the screen height, a caption set up on a 1080 screen comes out at the same place and the same proportion on a 4K projector.
Bold, italic and the rest
Section titled “Bold, italic and the rest”Bold · Italic · Underline · Strikethrough (⌘B ⌘I ⌘U / Ctrl+B Ctrl+I Ctrl+U)
land in different places depending on what is selected. Font, size and colour follow the same
rule.
| What is selected | Where it lands |
|---|---|
| Some text | That text only |
| Only the cursor is placed | The letters you type from there on |
| A box (not typing) | All the text in the box |
| Several boxes | All of those boxes |
Superscript (select text) and Subscript (select text) only work on selected text.
Colour
Section titled “Colour”Press Text color and the colour picker opens: a saturation and brightness square, a hue bar, a HEX field, an Opacity slider for that colour, the colours you used recently, and Pick from screen — an eyedropper, on the Mac and on Windows. The fill, border and background pickers have a No fill swatch — the one with a red diagonal line.
Press Pick from screen and a magnifier follows the pointer over the live screen — anywhere on
your desktop, in other programs too, even over a video that is playing. Click to take the colour
under its centre, or press Esc to give up. On Windows a right-click gives up too, the arrow
keys move the pointer one pixel at a time (ten with Shift), and Return / Enter takes the
colour; the magnifier is never drawn on an output screen, so the audience doesn’t see it.
Clear formatting
Section titled “Clear formatting”Clear formatting, at the right end of row 3, puts the styling of every selected box back to LayerCue’s own starting values (not a style you set as default), including formatting on parts of the text. The text, the position and the size stay as they are.
Outline and text shadow
Section titled “Outline and text shadow”Two things that keep text readable on stage, in their own groups in row 4. Each group turns blue while its effect is on, so you can see it without opening anything.
A new text box starts with Outline off. Turn it on and it is 8% wide and black; the ▾ beside it (Outline options) sets the Width (% of font size) and the Outline color, with its own opacity. Boxes you made before keep the outline they had — each box keeps its own setting — and a style you saved with Set as default style still applies to new boxes.
Text shadow is off to start. Turn it on and it starts at distance 5% · angle 135° · blur 6% · opacity 85%. The ▾ (Shadow options) changes Distance · Angle · Blur and the Shadow color. Distance and blur are % of font size; for the angle, 0° is to the right and it turns clockwise.
The shadow under a whole box (Box shadow) is a different thing — see Design tools.
Aligning
Section titled “Aligning”The Align group in row 4 does two different jobs. The first seven buttons place the text inside its box; the rest place the boxes on the slide.
| Button | What it does |
|---|---|
| Align text left · Center text · Align text right · Justify | Text across the box |
| Text to the top / middle / bottom of the box | Text up and down the box |
| Align across ▸ left · centre · right | Boxes across |
| Align down ▸ top · centre · bottom | Boxes up and down |
| Center on the slide | Boxes to the middle of the slide |
| Distribute H · Distribute V | Even spacing |
| Snap guides | Snapping while you drag — see below |
- One box selected: it goes to that edge or the centre of the slide, flush with no margin. Drag it afterwards if you want a margin.
- Several selected: they line up with each other. Center on the slide moves them to the middle as one block, keeping how they sit together.
- Distribute needs three or more selected boxes. The two outer ones stay put and the gaps between them become equal. With fewer, its tooltip says Select three or more to distribute.
- With nothing selected the buttons do nothing — the tooltip of Center on the slide says Select a box first.
Bringing a box forward or sending it back is in Design tools.
When text does not fit
Section titled “When text does not fit”When some text does not fit in its box, a small blue + badge appears under the box (Text is hidden). Press it and pick one:
| Choice | What it does |
|---|---|
| Expand box to fit text | Makes the box taller. With Word wrap off it widens it too |
| Shrink text to fit | Turns on Shrink to fit for that box |
To decide in advance, use the Fit group in row 4:
| Button | Starts | What it does |
|---|---|---|
| Word wrap | On | Breaks lines at the box edge |
| Shrink to fit | Off | Makes the text smaller when it does not fit — never larger than the size you set |
| Same text size across slides | Off | Keeps the size from jumping between slides. Needs Shrink to fit |
| Text inset | 0 | Space inside the box edges |
Resizing a text box never changes the font size. Use Shrink to fit for that.
Same text size across slides
Section titled “Same text size across slides”Shrink to fit shrinks each slide on its own, so a short verse comes out big and a long one small. Same text size across slides stops that.
- Consecutive slides that have it on form one group, and every slide in the group uses the size the tightest one fits at.
- One slide with it off — or a slide that is not a text slide — splits the group there. Use that to keep songs or sections apart.
- A slide that would have to go below 45% of its own size drops out of the group and is sized on its own.
With Shrink to fit off the button is dimmed and its tooltip ends with Turn on “Shrink to fit” to use this. Turning Shrink to fit off turns this off as well.
Text inset
Section titled “Text inset”The inset button opens Top · Left · Right · Bottom laid out in a cross, 0–25% each. The link button starts out on, so any field moves all four sides together. Press it (Unlink sides) to set them one by one, and again (Link all sides) to tie them back. Reset to 0 clears them. The button is tinted while any inset is set. Left and right are % of the screen height too, so the same number looks the same on every side.
Selecting, moving and resizing
Section titled “Selecting, moving and resizing”| Action | What it does |
|---|---|
| Click | Select only this box |
⌘-click / Ctrl-click |
Add or remove one box |
Shift-click |
Add |
| Drag from an empty spot | A selection rectangle. A box is caught only when the rectangle covers all of it — for a box hanging off the slide, the part on the slide is enough |
Shift-drag from an empty spot |
Add what the rectangle catches |
⌘-drag / Ctrl-drag from an empty spot |
Add or remove what the rectangle catches |
Tab · Shift+Tab |
Select the next or previous box, including ones hidden under others |
⌘A / Ctrl+A |
Select every box |
Picking a box that is under another one: Option-click / Alt-click selects the box under
the one now selected at that spot — click again to go deeper. Or right-click and use Select
overlapping, which lists the boxes under the pointer from top to bottom.
Moving. Drag a box. Hold Shift while dragging to keep to one direction. Option-drag /
Alt-drag moves a copy and leaves the original where it was. Arrow keys move the selection
by 10 pixels of a 1920-wide screen, Shift + arrow by 100, Option / Alt + arrow by 1 —
the same distance across and down.
Resizing. A selected box has eight small square handles; on a small box the middle ones are
left out so you can still grab the box itself. Drag a corner with Shift to keep the proportions.
Pictures, videos, SVG drawings and icons keep their proportions without Shift, and Shift lets
them go. The small circle above the box rotates it — hold Shift for 15° steps. With several boxes
selected, one frame goes around all of them, and its corners keep the proportions.
Snapping. With Snap guides on (it starts on), a box sticks to the slide’s edges and
centre, and to the edges and centres of other boxes, with a guide line where it sticks. While
moving it also sticks at equal spacing between boxes, and while resizing at the same
size as another box. Hold ⌘ / Ctrl while dragging to turn snapping off for that drag.
Off the slide. A box can hang off the edge of the slide, but a strip of it at least 2% of the slide wide and high always stays on the slide so you cannot lose it. To set a position or size by number, use Place in the Box group — see Design tools.
Position and size are all % of the screen, like the font size.
Background
Section titled “Background”The Background row under the canvas sets what is behind the boxes.
| Item | What it does |
|---|---|
| Colour chip (Background color) | Solid, Linear or Radial — a plain colour or a gradient. Its No fill swatch clears the colour or gradient |
| Select the background box | Appears when the slide has a background box, as a gradient background does — selects it so you can change it |
| Import image or video | Lays a file down as the background |
| Paste background | Lays down the picture on the clipboard |
| Fill · Stretch · Fit · Fit + blur bg | How the picture or video fills the screen |
| Background fit | Opens the Crop & fit sheet for cropping and framing — see Slide settings |
| Make it a picture box · Make it a video box | Lifts the background picture or video into a box that fills the slide, so you can shrink and move it. A video keeps its crop and fit; a picture keeps its fit but not its crop (The crop didn’t carry over — adjust the box size or fill) |
| ✕ (Clear the background — picture, video, color and gradient) | Clears all of it in one go |
A gradient background is a box at the very bottom of the slide. Clicking the canvas, the
selection rectangle and ⌘A / Ctrl+A all pass it by, so you never drag it by accident.
A picture pasted with ⌘V / Ctrl+V onto the canvas becomes a picture box, not the
background — use Paste background for that. The other way round, select a picture box or a
video box and press Set as background (Set as background video) in the ribbon’s
Change group, or right-click it — see Design tools.
A YouTube slide takes its picture from YouTube, so Import image or video, Paste background and the ✕ are dimmed there. On a streaming YouTube, Make it a video box is how you get text onto the slide: the YouTube plays inside the box.
Splitting and merging
Section titled “Splitting and merging”Split a slide that holds too much, and put pieces back together.
| Where | Action |
|---|---|
| While typing | ⌘Return / Ctrl+Enter — splits at the cursor. You carry on typing at the start of the second slide |
| At the very start of the text | ⌘⌫ / Ctrl+Backspace — joins this slide onto the one before |
| At the very end of the text | ⌘⌦ / Ctrl+Delete — pulls the next slide’s text in. On a Mac laptop, ⌦ is fn+Delete |
| Right-click a slide in the left column | Split into slides · Merge with previous · Merge 3 into one (with three picked) |
Split into slides splits at blank lines, and splits a piece again if it still does not fit the box. Words are kept whole. If there is nothing to split, it says Nothing to split — it already fits. Each new slide is a copy of the original with its share of the text, so the look stays the same.
When merging, text boxes in the same place on the slide are joined. The merged slide keeps the look of the first slide — its background and boxes. The other slides’ text comes along; their other boxes and backgrounds do not.
The text goes into the box whose role is Slide text (lyrics, body), or, on a slide without roles, the first text box. See Design tools.
Inside the editor none of this asks first. ⌘Z / Ctrl+Z undoes a merge, or a split made
with ⌘Return / Ctrl+Enter, in one step, and takes you back to where you were.
Copy, cut and paste
Section titled “Copy, cut and paste”⌘C / Ctrl+C and ⌘X / Ctrl+X take every selected box. ⌘V / Ctrl+V depends on what is
on the clipboard:
| Clipboard | Lands as |
|---|---|
| Boxes copied in LayerCue | Boxes (Pasted boxes). If they would sit exactly on the originals, they move down and to the right |
| A picture | A picture box (Added the picture) |
| Plain text | A new text box (Pasted as text box) |
| SVG code | A drawing — see Design tools |
| Slides copied in LayerCue | Slides, after the one you are editing |
⌘D / Ctrl+D, or right-click → Duplicate box, copies the selected boxes in one go and
puts the copies down and to the right.
While you are typing, these keys work on the text instead.
Passing a style along
Section titled “Passing a style along”Ways to give the same look to many boxes and slides.
| What | Where |
|---|---|
| Copy style · Paste style | Right-click a box, or ⌥⌘C · ⌥⌘V / Ctrl+Alt+C · Ctrl+Alt+V |
| Set as default style | Right-click a text box |
| Reset default style | The same menu |
Copy style works on text boxes only — on anything else it says Only text box styles can be
copied. Paste style goes onto every selected box. The style clipboard is separate from the
normal one, so text you copied with ⌘C / Ctrl+C stays there. Position, size, the text
itself, and formatting on parts of the text are not carried over.
Set as default style makes the selected text box the starting look for new text boxes from now on — new text slides, boxes you add, text you paste — until you choose Reset default style. It never sets position or size, and it does not touch shapes.
To restyle many slides at once, go to Show mode. Right-click a text slide’s card → Copy
style takes the style of that slide’s first text box. Pick the slides with ⌘ / Ctrl and
Shift, right-click → Paste style, and every picked slide’s text boxes get it. Boxes whose
role is Decoration or Backdrop are left alone.
This exists for the moment rehearsal tells you “the text is too small”: you do not have to open twenty slides one at a time. While editing is locked, Paste style does nothing.
Sending to the stage
Section titled “Sending to the stage”| Action | What it does |
|---|---|
| Show on output, at the top of the left column | Sends the slide you are editing to the stage |
| Double-click a slide in the left column | Sends that slide |
If the slide you are editing is a text slide already on stage, the stage follows your edits as you make them. For layers and taking things down, see Layers.
⌘Z / Ctrl+Z undoes and ⇧⌘Z or ⌘Y / Ctrl+Y or Ctrl+Shift+Z redoes. The two buttons
at the left end of row 1 do the same. They work while you are typing too, and you stay in
the text.
- Undo is kept for each slide, up to 80 steps. Undo only goes back through the slide you are on — when there is nothing left, it says Nothing to undo on this slide.
- Changing the same thing again within about a second joins it into one step — drag a slider for three seconds and it is still one undo.
- Right after you split at the cursor, merge, delete, add, duplicate or paste slides, or change a picture or
video background,
⌘Z/Ctrl+Zundoes that. Once you go on editing, undo stays with your new changes.
When editing is locked
Section titled “When editing is locked”If Lock editing while live is on in Settings › Stage, editing locks the first time a slide goes out while an output window is open, and LayerCue says Live — editing locked (unlock in the status bar). Anything you were typing is saved first, and editing unlocks again once every output window is off.
While editing is locked you can still select and look, but every change is refused with Editing is locked while presenting. Unlock it with the padlock on the bar along the bottom (Unlock editing). While editing is not locked, the same button shows a pencil and locks editing by hand (Lock editing). See Settings.
Changes from elsewhere
Section titled “Changes from elsewhere”The slide can change while it is open — for example when an AI app edits it. The editor takes those changes in and says Loaded changes made elsewhere; what you just changed yourself is kept. If the slide is deleted elsewhere, it says The slide you were editing was deleted elsewhere and opens the nearest slide.
Shortcuts
Section titled “Shortcuts”| Key | What it does |
|---|---|
| Double-click a text box | Start typing at that word |
Return / Enter |
Start typing in the selected box, at the end |
Esc |
Back out one step — cancel a drag → end typing → put down a tool → clear the selection → close |
⌘A / Ctrl+A |
Every box (every slide after clicking the left column; all the text while typing) |
Tab · Shift+Tab |
Next or previous box |
Option-click / Alt-click |
The box underneath |
| Arrow keys | Move 10 px · Shift 100 px · Option / Alt 1 px (on a 1920-wide screen) |
Delete or Backspace |
Delete the selected boxes (slides, after clicking the left column) |
⌘D / Ctrl+D |
Duplicate the selected boxes (the slide, after clicking the left column) |
⌘C · ⌘X · ⌘V / Ctrl+C · Ctrl+X · Ctrl+V |
Copy · cut · paste |
⌥⌘C · ⌥⌘V / Ctrl+Alt+C · Ctrl+Alt+V |
Copy style · paste style |
⌘B ⌘I ⌘U / Ctrl+B Ctrl+I Ctrl+U |
Bold · italic · underline |
⌘] · ⌘[ / Ctrl+] · Ctrl+[ |
Bring forward · send backward (add Shift for to front · to back) |
⌘Z / Ctrl+Z |
Undo |
⇧⌘Z or ⌘Y / Ctrl+Y |
Redo |
⌘Return / Ctrl+Enter |
Split the slide at the cursor |
⌘⌫ / Ctrl+Backspace · ⌘⌦ / Ctrl+Delete |
Join onto the slide before · pull in the slide after |
Shift + drag |
Keep to one direction · keep proportions on a corner · 15° steps on the rotation circle |
Option-drag / Alt-drag |
Move a copy |
⌘ / Ctrl while dragging |
No snapping |
Shift · Option / Alt on a number field |
Steps ten times bigger · ten times smaller |
Every shortcut in LayerCue is in Keyboard shortcuts.
Starting values
Section titled “Starting values”A new text box starts like this.
| Item | Starting value |
|---|---|
| Font | Default font (Pretendard JP) |
| Font size | 7% of screen height |
| Text color | White |
| Tracking · Line height · Paragraph spacing | 0% · 130% · 0% |
| Glyph scale | 100% across · 100% down |
| Alignment | Centred across and down |
| Outline | Off (when turned on: width 8%, black) |
| Text shadow | Off (when turned on: distance 5% · angle 135° · blur 6% · opacity 85%) |
| Word wrap | On |
| Shrink to fit · Same text size across slides | Off · off |
| Text inset | 0 on every side |
| Fill · border | None |
| Opacity · Rotation | 100% · 0° |
| Size and place | 80% × 80% in the middle; 60% × 16% when the slide already has something on it |
Set as default style changes the style rows of this table for you. Position, size, Rotation and Same text size across slides stay as above.
If this is your first time here, read The main window and Your first show first. If something is not working, see When something goes wrong or tell us at support@layercue.com.