Slides
A slide is one thing you put on the screen — a video, a picture, a page of text, a YouTube video — or a sound you play. In the middle of the window each presentation is a section: its header, then its slides as cards.
Add it → put it in order → click it. This page is about the list itself. What each slide remembers — crop, In and Out points, speed, volume — is in Slide settings. Writing and designing text is in The slide editor. The screen and the layers are in Screens and going live and Layers.
What you can add
Section titled “What you can add”| Kind | Badge on the card | How it comes in |
|---|---|---|
| Video | Video | Add File, drag and drop, or paste |
| Picture | Image | Add File, drag and drop, or paste — a screen capture too |
| Audio | Music | Add File, drag and drop, or paste |
| Text | Text | Made in the slide editor, or paste text |
| YouTube | YouTube | Link, or paste the address. See YouTube |
The extension decides the kind.
| Video | mp4 · mov · m4v · mkv · webm · avi · mpg · mpeg · ts · wmv |
| Picture | jpg · jpeg · png · heic · gif · webp · tiff · bmp |
| Audio | mp3 · m4a · aac · wav · flac · aiff · aif · opus · ogg |
Any other file is not added, so it can’t fail later on stage. A notice names it: … isn’t a format we can play, so it wasn’t added — or, for several, … and N more aren’t formats we can play, so they weren’t added.
Pictures keep their true colours. A photo that carries a colour profile — a CMYK file made for print, or a wide-gamut one in Display P3 or Adobe RGB — is converted the way a photo viewer converts it, everywhere: on the cards, in the previews, in the editor and on the output screens. Card pictures made by an earlier version are redone quietly in the background; until then the old one shows.
An audio slide puts nothing on the screen. Click it and the sound plays the way music does; whatever is on the screen stays as it is.
A PowerPoint file (.pptx) or a PDF does not become one slide. Pick it with Add File or drop it
on the list and its pages are imported as slides — with Add File at the end, dropped on the list
where the bar shows (on the middle of a card, right after that card).
See PowerPoint and PDF.
Adding
Section titled “Adding”Add File and Link
Section titled “Add File and Link”At the right of each presentation’s header sit + (Add File) and the chain (Link). The header’s right-click menu has them too.
- Add File — pick one file or several. They go to the end of that presentation. Sound files are listed under the Audio file type in that window; switch to it, or to All files.
- Link — paste a YouTube address. The slide goes to the end and is named by the video’s ID until the real title arrives a moment later.
Drag and drop
Section titled “Drag and drop”Drag files in from the Finder / File Explorer. The presentation that will take them gets a faint outline, and a bar between the cards shows where they will land. Drop them and they are inserted there.
The whole area around a presentation’s cards takes a drop, not just the gaps between them: the margins at the sides, and the row of its header — drop on or beside the header and the files go to the end. Below the last presentation, the empty space down to the bottom of the window belongs to it as well, so a drop there adds the files to its end.
Drop one file on the middle of a card and it swaps that slide’s media. The card lights up to show it is the one that will change. No new slide appears. Near the edge of a card, or with several files, it inserts instead.
When you drop a file whose name is already in the media folder, A file with that name already exists appears and lists the names.
| Choice | What it does |
|---|---|
| Use existing | Uses the file that is already there. Pick this when you are reusing the same picture |
| Replace | Overwrites it. Every slide that uses that file shows the new one |
| Keep both | Brings it in under a new name with a number added |
It compares names only, not what is inside the files. It asks only when you drag and drop to insert — a swap, Add File and pasting never ask; they keep both and add a number.
With the slide list in focus, ⌘V / Ctrl+V makes new slides from whatever is on the clipboard.
They land after the last selected slide, or at the end if nothing is selected.
| What you paste | What you get |
|---|---|
| Files copied in the Finder / File Explorer | A slide for each, as if you had added them |
| A picture itself, such as a screen capture | Saved as a PNG in the media folder, as a picture slide |
| A YouTube address | A YouTube slide |
| Text | Text slides. Longer text is split at blank lines, and again wherever a part doesn’t fit on one slide |
| Slide HTML an AI chat gave back | The slides it describes — see Connect an AI app |
| Text boxes copied in the editor | Nothing — Paste text boxes in edit mode |
Copying
Section titled “Copying”LayerCue works from its own copy of each file. A file from outside the media folder goes into the list at once and is copied behind it. Meanwhile the card says Copying with a progress bar. Until the copy is done it plays from your original, so you can use it straight away. Where the media folder is: Where your files live.
Reading a card
Section titled “Reading a card”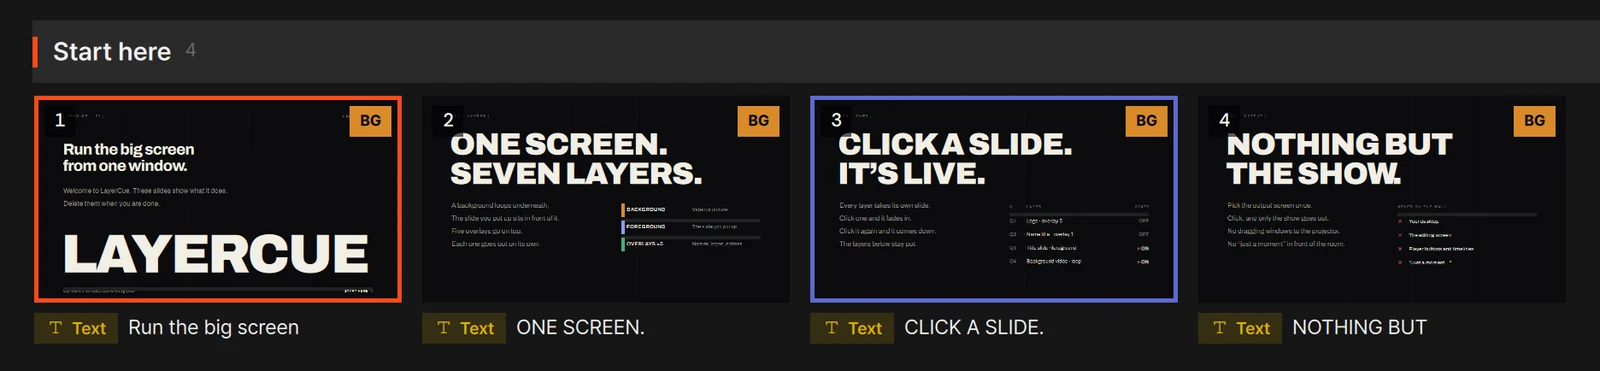
| Where | What it tells you |
|---|---|
| Top left | Its number in the presentation |
| Top right | The layer chip — see below |
| Bottom right | How long it runs, with its In and Out points and speed taken into account |
| Under the picture | The kind badge and the name. YouTube ↓ means it is set to play its downloaded copy |
| Orange border | It is on the screen now, on any layer |
| Indigo border | It is selected |
| Copying and a bar | The file is still being copied into the media folder |
| File missing | The file can’t be found — see below |
Clicking a card
Section titled “Clicking a card”| What it does | |
|---|---|
| Click the picture | Sends it out. It also becomes the selected slide |
| Double-click the picture | Sends it out again from the beginning |
| Click the name under the picture | Selects it and loads it into Slide settings on the right. Nothing goes out |
| Option-click / Alt-click the picture | The same as clicking the name |
| Double-click the name | Opens it in the slide editor |
⌘-click / Ctrl-click, Shift-click |
Selects several — see below |
| Right-click | The card menu |
Sending a slide out does not pull Slide settings along with it. The two are kept apart on purpose, so you can set up the next slide while another one is out.
A click puts the slide on the stage; it never switches a monitor on. Each output monitor has its own power switch above its preview, and a monitor that is on already shows the stage. If you have switched every monitor off, LayerCue tells you once, the first time you send a slide: All monitors are off — turn one on with the power button above the preview. See Screens and going live and Multi-Output.
Clicking a slide that is already out does nothing — it stays up and keeps playing. That is deliberate: a stray second click during the show should not take anything down. To take things down, use the × beside that layer in the layer column next to the preview (Clear this layer), CLEAR at the top of that column (Clear All), or the keys. The red ■ beside ▶ takes down only the layer that row is working with.
F1, or ⌘1 / Ctrl+1 |
Clear All |
F2, or ⌘2 / Ctrl+2 |
Takes the foreground down |
F3, or ⌘3 / Ctrl+3 |
Takes the background down |
F4, or ⌘4 / Ctrl+4 |
Takes all the overlays down |
More in Layers.
The layer chip
Section titled “The layer chip”The chip at the top right of a card says which layer the slide goes out on. BG and the overlays (1 Overlay to 5 Overlay, or the number and the name you gave it) always show. FG — the foreground, where slides go unless you say otherwise — shows only while the pointer is over the card.
| What it does | |
|---|---|
| Click the chip | Foreground ↔ background |
| Click it while it is on an overlay | The next overlay: 1 → 2 → 3 → 4 → 5 → 1 |
| Press and hold the chip | Over to overlay 1. Hold it again on an overlay to come back to the foreground |
If the card is part of the selection, the whole selection changes — Changed layer for N says how many. The card menu’s Layer ▸ and Overlay ▸ do the same thing.
Pictures, videos, text and YouTube can go on any layer. An audio slide goes on none: its chip says Music and does nothing when clicked.
Giving a slide a background makes it a background slide. Put a picture, a video, a colour or a gradient in the Background row of the slide editor and the slide moves to the background by itself — its chip says BG — unless you have chosen its layer yourself, or it is a YouTube or web slide. On stage such a slide splits in two: its background goes to the background layer and stays there under the slides that follow, while its text and other boxes go to the foreground. Click the chip to make it a foreground slide again, and the whole slide, background and all, goes out on the foreground. Empty its Background row completely and it goes back to the foreground by itself. See Layers.
When the presentation’s header has a layer set for every slide (Layer for this list), the chips are dimmed and stop responding. Each slide’s own layer is kept, and comes back when you clear that setting. See Layers.
The card menu
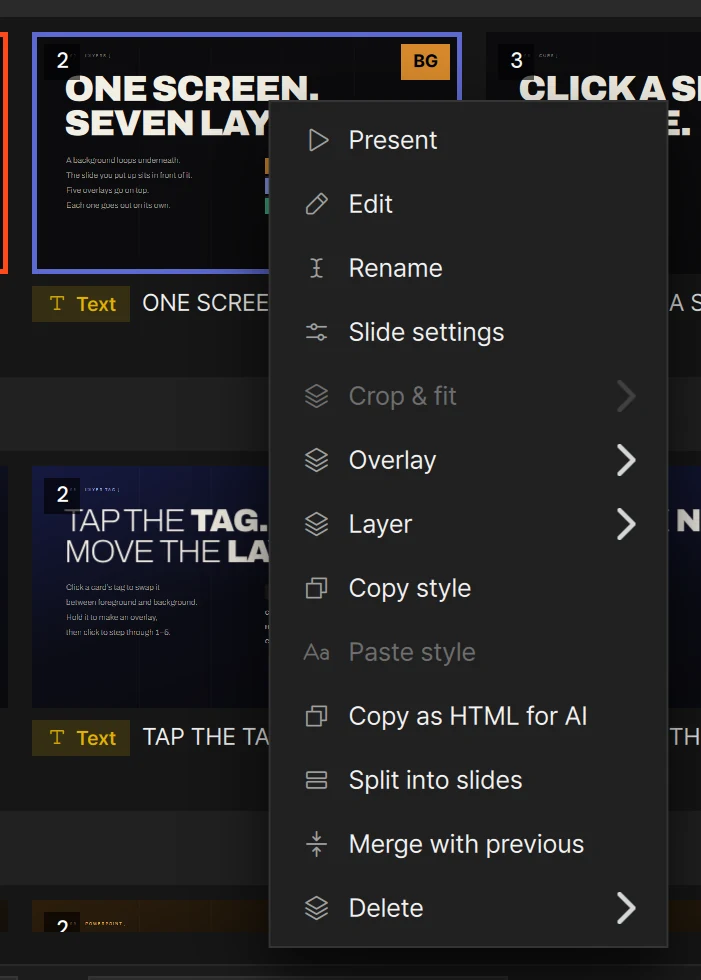
Section titled “The card menu”Right-click a card. If the card isn’t part of the selection, it alone is selected first. If it is, the layer, Crop & fit (all but Set crop area…), Paste style, Copy as HTML for AI and Delete (all but Delete download) work on the whole selection.
| Locate file | Only when the file is missing — see below |
| Present | The same as clicking the picture |
| Edit | Opens the slide editor at this slide. A video or picture slide can carry text boxes too |
| Rename | Gives it a different name |
| Slide settings | Loads it into Slide settings. When the window is too narrow for that panel, this opens it as a window of its own |
| Crop & fit ▸ | Fill, Stretch, Fit, Fit + blur bg (● marks the current one), Clear crop, and Set crop area…, which opens the Crop & fit sheet. For pictures, videos and downloaded YouTube only |
| Overlay ▸ | Puts it on one of the five overlays |
| Layer ▸ | Foreground or Background |
| Copy style · Paste style · Copy as HTML for AI | For text slides — see below |
| Show in Finder / Show in Explorer | Opens the folder with the slide’s file selected. For a downloaded YouTube slide, the download. Not there when the slide has no file |
| Split into slides · Merge N into one · Merge with previous | For text slides — see below |
| Delete ▸ (Delete N for several) | See Deleting |
A change of fit on several slides is reported as Changed scale for N. What Fill, Fit and the crop do is explained in Slide settings.
Selecting several
Section titled “Selecting several”⌘-click / Ctrl-click |
Adds or removes one at a time |
Shift-click |
Everything from the last one you clicked to here |
Shift-⌘-click / Shift-Ctrl-click |
Adds that range to what is already selected |
⌘A / Ctrl+A |
Every slide in this presentation |
| Drag from an empty spot | A box — any card it touches is selected. With Shift or ⌘ / Ctrl held, it adds to the selection |
| Click an empty spot | Clears the selection. So does Esc |
An empty spot is any free space in the presentation’s area: the gaps between the cards, the margins at the sides — beside the header too — and the space below the cards. Below the last presentation, the empty space down to the bottom of the window counts as well, so you can start a box there even when the cards fill every row.
Moving and copying
Section titled “Moving and copying”Reordering
Section titled “Reordering”Press a card and pull it a little to start dragging. A bar shows where it will land, and the list scrolls by itself when you reach its top or bottom edge.
- If the card you grab is outside the selection, only that card moves.
- If it is inside, the whole selection moves together. The dragged picture shows how many.
- On a touch screen, hold for a moment before dragging, so a scroll isn’t taken for a drag.
Esccancels a drag that is under way.
The keyboard does it too:
⌥⌘← / Ctrl+Alt+← |
One place back |
⌥⌘→ / Ctrl+Alt+→ |
One place forward |
⌥⌘↑ / Ctrl+Alt+↑ |
To the very front |
⌥⌘↓ / Ctrl+Alt+↓ |
To the very end |
To another presentation
Section titled “To another presentation”| Drop them | Where they land |
|---|---|
| Between the cards of another presentation’s section | At that spot |
| On another presentation’s header | At its end |
| On a presentation row under Library in the sidebar | At its end |
In the sidebar, only the presentations in the Library drawer take slides — not the cue sheets. Rest on a closed library there for a moment (about 0.6 seconds) and it opens, so you can drop on a presentation inside it.
Afterwards Copied N to … or Moved N to … appears, with an Undo ⌘Z / Undo Ctrl+Z button.
Duplicate, copy, cut, paste
Section titled “Duplicate, copy, cut, paste”⌘D / Ctrl+D |
Duplicates the selection, right after it |
⌘C / Ctrl+C |
Copies |
⌘X / Ctrl+X |
Cuts |
⌘V / Ctrl+V |
Pastes after the last selected slide, or at the end |
Cut takes nothing away on the spot. It only marks the slides — Cut N — they move when you paste — and they leave their old place when you paste them. Copy in one presentation and paste in another to take slides across.
A duplicate or a pasted slide is a new slide of its own. Change it and the original stays as it was.
Deleting
Section titled “Deleting”Delete or Backspace deletes the selected slides — the slides only.
In the card menu, Delete ▸ (Delete N with several selected) opens up to three choices:
| What goes | |
|---|---|
| Delete download | Only on a YouTube slide with a download. The slide stays and the downloaded copy goes, so the slide streams again |
| Slide only | The slide leaves the presentation. Its file stays in the media folder |
| Slide and file (to Trash) | The slide, and its file goes to the Trash / Recycle Bin. Greyed out for a slide with no file of its own |
Deleting slides asks first in two cases only:
| When | The window says |
|---|---|
| A selected slide is on the screen | Delete N slides? and Some of these are on air right now. |
| Ten or more at once | Delete N slides? |
Otherwise they go at once and Deleted N appears. Press its Undo ⌘Z / Undo Ctrl+Z button, or the keys themselves, to bring them back.
Deleting the file as well
Section titled “Deleting the file as well”Slide and file (to Trash) opens a window to confirm; press Move to Trash. What goes is LayerCue’s copy in the media folder. The original you added it from is not touched.
If other slides use the same file, the window warns you first and the button becomes Move to Trash anyway. Go ahead and those slides are not deleted: they lose their video, picture or sound, and keep their text boxes, layer and background. The notice afterwards counts both — N file(s) to Trash · media removed from N slide(s).
When a file has gone missing
Section titled “When a file has gone missing”A card that can’t find its file is tinted red and says File missing. Press Locate file — on the card, or at the top of its right-click menu — and pick the file on this computer. It is copied into the media folder like any new file, and Relinked appears.
Pick a file with the same name and the other slides follow. Every other slide that used the old file is relinked too — Also relinked N other slide(s) using the same file. A moved folder is the usual case.
Pick a file with a different name and only that slide changes — Changed this slide only — N other slide(s) still point at the old file. Sometimes you do mean to swap just one picture.
Text and YouTube slides have no file to lose, so they never show File missing. If the download of a YouTube slide disappears, the slide simply streams again.
Text slides in the list
Section titled “Text slides in the list”You write text in the slide editor. In the list you can name, split, merge and restyle text slides without opening it.
A text slide names itself from the first line of its text, up to 40 characters — from the box whose role is Title if it has one, otherwise from the box that holds the slide text. Edit the text and the name follows. A slide with no text yet is New slide.
| When it shows | What it does | |
|---|---|---|
| Split into slides | One slide selected | Splits the text at blank lines, and again wherever a part doesn’t fit — the same rule as pasting text. If there is nothing to split: Nothing to split — it already fits |
| Merge N into one | Several selected | Joins their text onto the first slide and removes the rest |
| Merge with previous | One slide, not the first | Joins it onto the slide before |
Merging keeps only the first slide’s look. Backgrounds and shapes on the other slides are lost,
so it asks first when one of them has a different background. Splitting or merging a slide that is
on the screen also asks first. Each one comes back with a single ⌘Z / Ctrl+Z.
Copy style and Paste style
Section titled “Copy style and Paste style”Copy style picks up the formatting of a slide’s first text box. Select the slides you want to change, right-click one of them and choose Paste style — it goes onto every selected slide at once, and Style applied to N slides appears. It is there for the moment in rehearsal when the text turns out too small and you don’t want to open twenty slides one by one.
- Only formatting travels: font, size, color, outline, shadow, alignment, the box’s fill and border and so on. The text, its position and the box’s role stay as they were.
- Boxes whose role is Decoration or Backdrop are skipped, so a designed slide keeps its header and badges. Roles are set in the slide editor.
Copy as HTML for AI
Section titled “Copy as HTML for AI”Copy as HTML for AI puts the selected slides on the clipboard as HTML, for an AI chat that
isn’t connected to LayerCue. Paste the chat’s answer back into the slide list with ⌘V / Ctrl+V.
See Connect an AI app.
Card size
Section titled “Card size”Drag the slider in the status bar at the bottom, or press ⌘+ / Ctrl++ and ⌘- / Ctrl+- with the
slide list in focus. Settings also has S, M and L under Slide card size.
| Slider | 130 to 340 |
| S · M · L | 170 · 210 · 260 |
⌘+ / Ctrl++, ⌘- / Ctrl+- |
20 bigger or smaller at a time |
The numbers are the card width LayerCue aims for, in pixels; the real width shifts so a row of cards fits the list. It is remembered for next time. Bigger cards mean fewer wrong clicks in a dark booth.
When editing is locked
Section titled “When editing is locked”The pencil in the status bar is Lock editing. Press it and it becomes a padlock (Unlock editing). Turn on Lock editing while live in Settings and it locks by itself the first time you put something on stage while an output window is open — Live — editing locked (unlock in the status bar) — and unlocks once every output window is off again. If you unlock it yourself in between, it stays unlocked.
While it is locked, the list can’t change: adding, deleting, moving, pasting, renaming, splitting
and merging, changing layers or Crop & fit. Usually Editing is locked while presenting
appears. Paste style does nothing, and ⌘Z / Ctrl+Z is switched off.
Clicking slides to send them out, Option-click / Alt-click, selecting and copying all work as usual.
These work when the slide list has focus — click a card’s name or an empty spot in the list first. While you type in a name or a link window, they stay out of the way.
| Key | What it does |
|---|---|
← → |
The previous / next slide — and it goes out |
↑ ↓ |
One row up / down — it goes out |
Home / End |
The first / last slide — it goes out |
PageUp / PageDown |
Three rows at a time — it goes out |
Return / Enter |
Sends out the slide the cursor is on — the one you reached with Option / Alt + arrow keys |
Option / Alt + arrow keys |
Moves without sending anything out |
Shift + arrow keys |
Widens the selection, without sending anything out |
The arrow keys carry on from the slide that went out last, so the next one is always the next one.
Undo and redo work wherever the focus is in the window — except inside the slide editor, which has its own, and while editing is locked.
| Key | What it does |
|---|---|
⌘Z / Ctrl+Z |
Undo |
⇧⌘Z or ⌘Y / Ctrl+Shift+Z or Ctrl+Y |
Redo |
Every key in one place: Keyboard shortcuts.