Music
Music runs on its own channel, apart from the slides. Sending slides, clearing a layer,
Clear All, F1–F4 (⌘1–⌘4 / Ctrl+1–Ctrl+4) and switching a monitor off all leave it
playing — only a sound slide takes its place (see
Sound files in a presentation).
To stop the music, use the ■ (Stop) under the music list.
It has its own column in the band across the top of the window. From left to right the band holds the stage (with a second monitor beside it when you use more than one output monitor), the meter, Music and Slide settings. On a narrow window the Music column can fold away — see When the window is narrow.
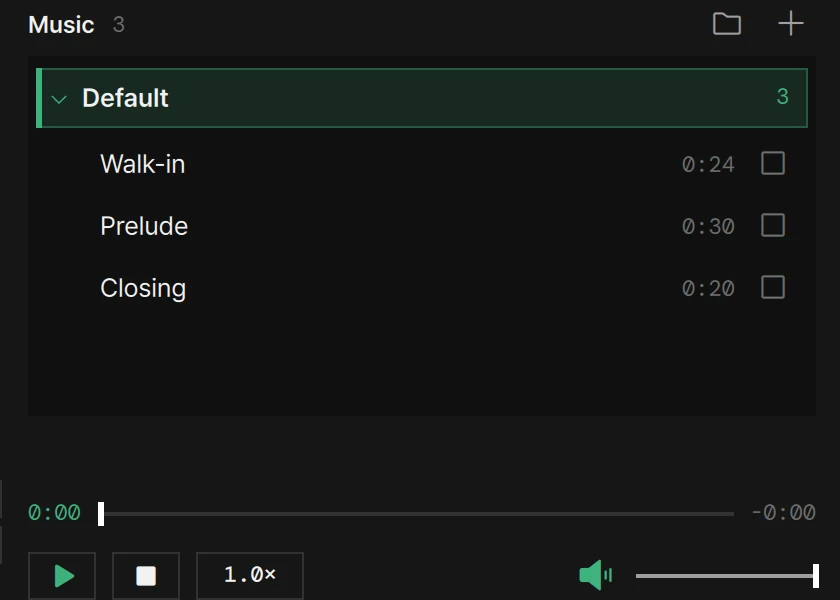
The number beside the Music heading is how many tracks the list holds.
Adding tracks
Section titled “Adding tracks”| What you want | How |
|---|---|
| Pick files | The + at the right of the Music heading (Add music). You can pick several at once |
| Drag them in | Drop the files anywhere on the dark list box. It takes a green tint and outline while you drag. An empty list says Drop music here |
Nine formats go in:
mp3 · m4a · aac · wav · flac · aiff · aif · ogg · opus
Anything else that comes along — video, pictures — is left out without a word, so the list never fills up with rows that will not play. A folder dropped as a whole is not opened; drop the files inside it.
New tracks go into the folder that is open. If no folder is open, they go into the first one. Either way that folder opens, so you see them arrive. Dropping onto a particular folder bar does not choose that folder — open it first, then drop.
Folders
Section titled “Folders”An event easily gathers a dozen tracks. Split them into folders and there is less hunting on stage.
- If there is no folder yet when you add your first tracks, LayerCue makes one for them called Default. Rename it as you like.
- The folder button beside the + (Add folder) makes a folder and asks for its name straight
away. Type it and press
Return/Enter. Close the box without that and the folder is called New Folder. - Click a folder bar to open it, click it again to close it. Only one folder is open at a time — opening one closes the other. The open folder’s bar is tinted green, with a green bar at its left edge.
- The right end of a bar shows how many tracks · their total length.
- Drag a folder bar up or down to change the order of the folders. An open folder brings its tracks with it.
If the track that is playing sits in a closed folder, that folder’s bar shows a small green square and the track’s name, so you can see what is running without opening it.
Track order, and copying to another folder
Section titled “Track order, and copying to another folder”Drag a track row up or down to change the order; a line shows where it will land. Tracks move within their own folder only, and this order is the order Play next follows.
Drop a track on another folder’s bar and it is copied there: a new row appears in that folder and the original stays where it was. The file is not duplicated — both rows play the same file. The copy takes the range, volume, end action and speed the track had at that moment; after that the two are set separately. That is how you use one song cut two different ways.
To really move a track, copy it and then remove the original row with List only.
Playing, pausing, stopping
Section titled “Playing, pausing, stopping”| What you want | How |
|---|---|
| Play a track | Click its row. It comes in on Music fade in. If another track is playing, the two crossfade |
| Start the playing track over | Double-click its row. It goes back to its start (its In point, if it has one) |
| Pause, and carry on | The play / pause button under the list (Play / Pause) |
| Stop | The ■ beside it (Stop) |
| Jump to another spot | Drag the progress bar under the list. It jumps when you let go |
| Silence the music only | The speaker button (Mute) |
| Change the volume now | Click or drag the thin bar at the right end |
Clicking the track that is already playing does nothing. It neither pauses nor restarts — the same as a slide that is already up. Pause and stop with the buttons under the list.
The playing row is tinted green, with a green bar down its left edge. Under the list, the time on the left is how far it has played and the one on the right, with a minus sign, is how much is left. For a track with a range, both count the range only.
The volume bar and the speed chip (1.0×) on that row act on what is playing now. Neither is saved — not on the track, and not for the next time you open LayerCue. The volume and speed a track keeps are set in Track settings, below.
The master fader and MUTE in the meter column act on the music as well as the stage. See Sound and the meter.
Track settings — what each track keeps
Section titled “Track settings — what each track keeps”Point at a track row and click the sliders button that appears, or right-click the row → Track settings. The heading of the right-hand panel changes from Slide settings to Track settings: it is the same panel, now showing the track, and the track’s row gets a green outline. When a slide comes into the panel again, it goes back to Slide settings. If the window is too narrow for that panel, see When the window is narrow.
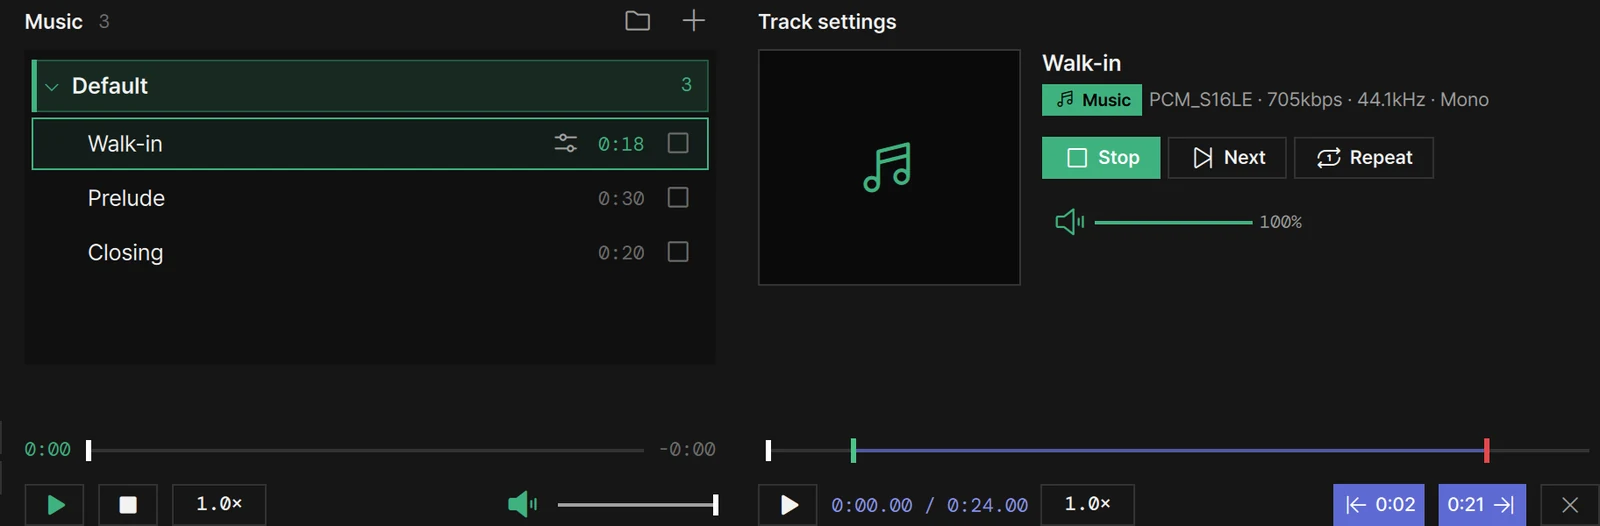
| What you set here | What it does |
|---|---|
| Format line | Under the name: a Music badge and a line such as MP3 · 320kbps · 44.1kHz · Stereo. If the file cannot be read, it says Format unknown |
| Stop · Next · Repeat | What to do when the track ends — see below. The lit one is the current choice |
| Volume | Saved on the track. Use it to even out a track recorded louder or softer than the rest, or to keep one low under speech. The speaker switches between silent and 100% |
| Progress bar and ▶ | A preview of the track, apart from the music going out |
| Speed chip | 0.25× to 3× in steps of 0.05, with Reset to 1×. Saved on the track |
| In point · Out point | Where the track starts and ends when it plays |
| Clear In/Out | Removes both. It shows only while one is set |
On the track that is playing, a new range, end action or volume takes effect at once — no need to start it again. Set the speed before the track goes out; for the moment itself, use the 1.0× chip under the list.
Setting the range
Section titled “Setting the range”- Play the preview with the ▶ in Track settings, or click and drag its progress bar to the spot.
- Press In point where the track should start, and Out point where it should end. Each button then shows its time.
The range shows on the bar: shaded, with a green tick at the In point and a red one at the Out point. An Out point before the In point is not taken; an In point after the Out point clears the Out point. Use it to trim talk at the front or silence at the end.
With a range, the length in the list shows the range’s length, in green, and the folder’s total adds up those lengths.
When the window is narrow
Section titled “When the window is narrow”When the window is too narrow for everything in the top band, Slide settings folds away first and then Music. In their place a slim summary column stands at the right end of the band. Nothing opens by itself.
Once Music has folded, the bottom of that summary keeps the music within reach: the name of the track that is playing — Nothing playing when there is none — with the time left, then play / pause, ■ (Stop), mute and the volume bar. They do exactly what the ones under the music list do.
To get the whole column, click Music at the head of that part of the summary (its tooltip says Open in a window). The Music column opens in a window of its own beside the main window, headed MUSIC, and the music plays on without a break. Close that window with its ✕ when you are done. If you widen the main window until the column fits again, it goes back into the band by itself and the window disappears. The second button in the title bar, the one that brings Slide settings back, widens the window just enough for both columns to come back in, as far as the screen allows.
Track settings folds with Slide settings. While it is folded, the sliders button on a track row shows the track in the summary instead: its name, the Music badge and format line, and Stop · Next · Repeat. For everything else — the volume, the preview, the speed and the range — right-click the row → Track settings, or click the Track settings heading of the summary: the whole panel opens in its own window beside the main window.
When a track ends — the end action
Section titled “When a track ends — the end action”The button at the right end of each track row shows what happens when that track ends. Each click moves it to the next of three. In Track settings the same three are spelled out as Stop, Next and Repeat.
| End action | What it does |
|---|---|
| Stop at end | The track stops and goes back to its start. Its row stays green, so play it again with Play under the list or a double-click. Every new track has this |
| Play next | Carries on with the next track in the open folder |
| Repeat one | Plays the track — or its range — over and over |
Each track has its own, so “repeat this one” and “carry on with the rest” can live in the same list.
How Play next carries on:
- It follows the order of the folder that is open. After the last track it goes back to the first.
- The next track comes in on Music fade in, then follows its own end action.
- If the track is the only one in the folder, it stops.
- If the playing track’s folder is closed and another one is open, it carries on with the first track of the open folder. With no folder open, it stops.
When sounds overlap — Settings › Stage › Music
Section titled “When sounds overlap — Settings › Stage › Music”The Stage page of Settings has a Music group. Changes apply at once.
| Row | What it does | Default |
|---|---|---|
| Music fade in | How long a track takes to come up when it starts, and when you carry on after Pause | 0.8 s |
| Music fade out | How long it takes to fade away when you press Stop | 1.2 s |
| Music crossfade | How long two tracks overlap when you start one while another is playing | 1.5 s |
| Music while video plays | Keep · Lower · Mute | Keep |
| Lower to | Shows only when you pick Lower. How far the music drops: 0 is silent, 1 leaves it as it is | A quarter |
The three times run from 0 to 5 seconds. Music crossfade is the moment an audience notices most — try it once in rehearsal.
When a file has gone
Section titled “When a file has gone”A track whose name is red has lost its file. Right-click the row → Relink file → pick the file.
If you moved the whole media folder and set its new place in Settings › Files & YouTube › Media folder, LayerCue finds each track there by its folder and file name the next time it starts.
Renaming and deleting
Section titled “Renaming and deleting”- Right-click a track → Rename. Only the name in the list changes; the file keeps its own.
- Right-click a folder bar → Rename.
- Confirm with
Return/Enter. Click outside the box to leave the name as it was.
When a track first comes in and its file carries a title tag, the list shows that title instead of the file name. A name you gave it yourself is never replaced.
Deleting comes in two kinds — the row only, or the row and its file in the media folder.
| Right-click | Row only | Row and file |
|---|---|---|
| A track | List only | Track and file (to Trash) |
| A folder bar | Folder only (keep files) | Folder and files (to Trash) |
- List only and Folder only (keep files) act at once, without asking.
- The other two ask first, and move the files to the Trash / Recycle Bin rather than deleting them, so you can take a file back from there.
- If another track uses the same file — a copy in another folder, say — the box warns you. Go ahead and that track turns red, but its row stays.
- Deleting a folder with its files leaves any file that a track outside the folder still uses.
Sound files in a presentation
Section titled “Sound files in a presentation”A sound file can also go into a presentation as a slide. Its card carries a green Music chip.
Click the card and the sound plays on the same channel as the music list. What is on the screen stays as it is. So a sound slide takes the place of any music that is playing — the two crossfade, just as when you start another track. The ■ (Stop) under the music list stops it.
- It goes on no layer, so clicking its Music chip does nothing.
- It is not a row in the music list, so no row turns green.
Keep music that runs through the event in the music list, and use a sound slide for a sound that belongs at one point in the running order.
Music and an AI app
Section titled “Music and an AI app”A connected AI app can run the music too: play a track by its name, pause and carry on, stop, skip to the next track, and set the volume. It sees only the folder that is open. See Connect an AI app.
Values to remember
Section titled “Values to remember”| Music fade in | 0.8 s (0–5 s) |
| Music fade out | 1.2 s (0–5 s) |
| Music crossfade | 1.5 s (0–5 s) |
| Music while video plays | Keep (with Lower, a quarter) |
| A new track | Stop at end · volume 100% · speed 1× · no In or Out point |
| Speed | 0.25× to 3× |
| The folder made for your first tracks | Default |
← → |
With the progress bar in Track settings clicked, move in very small steps |
Shift + ← → |
The same, ten times as far |
Return / Enter |
Confirm a track or folder name |
There are no keys that play or stop the music — use the buttons under the list. Every other shortcut is in Keyboard shortcuts.
If something does not work, see When something goes wrong or write to support@layercue.com.