Settings
The values you set once and then carry from show to show live in one window. Click the gear at the right end of the status bar (its tooltip says Settings) and it opens.
Opening and closing
Section titled “Opening and closing”Seven pages are listed down the left, numbered from 01 to 07. Click one and the page on the right changes. Its number and name stand at the top, and its values are grouped under small headings, one value to a row: what it is on the left, the control on the right.
| Page | What is in it |
|---|---|
| 01 General | Language · slide card size · remembering the window layout and the master volume |
| 02 Stage | Edit lock · default fades · output monitors · virtual screens · music · Auto-dismiss |
| 03 Overlay names | Names for the five overlays |
| 04 Files & YouTube | Media folder · bringing outside files in · bundles · YouTube downloads and how captions look |
| 05 Tools | LayerCue’s own version and updates · the YouTube tool |
| 06 AI apps | Letting an AI app on this computer use LayerCue |
| 07 Account | Who is signed in · keeping settings in your account · deleting the account |
Close the window with Esc, by clicking outside it, or with the ✕ at the top right
(Close). Values save as you change them — there is nothing to confirm.
Sign in first
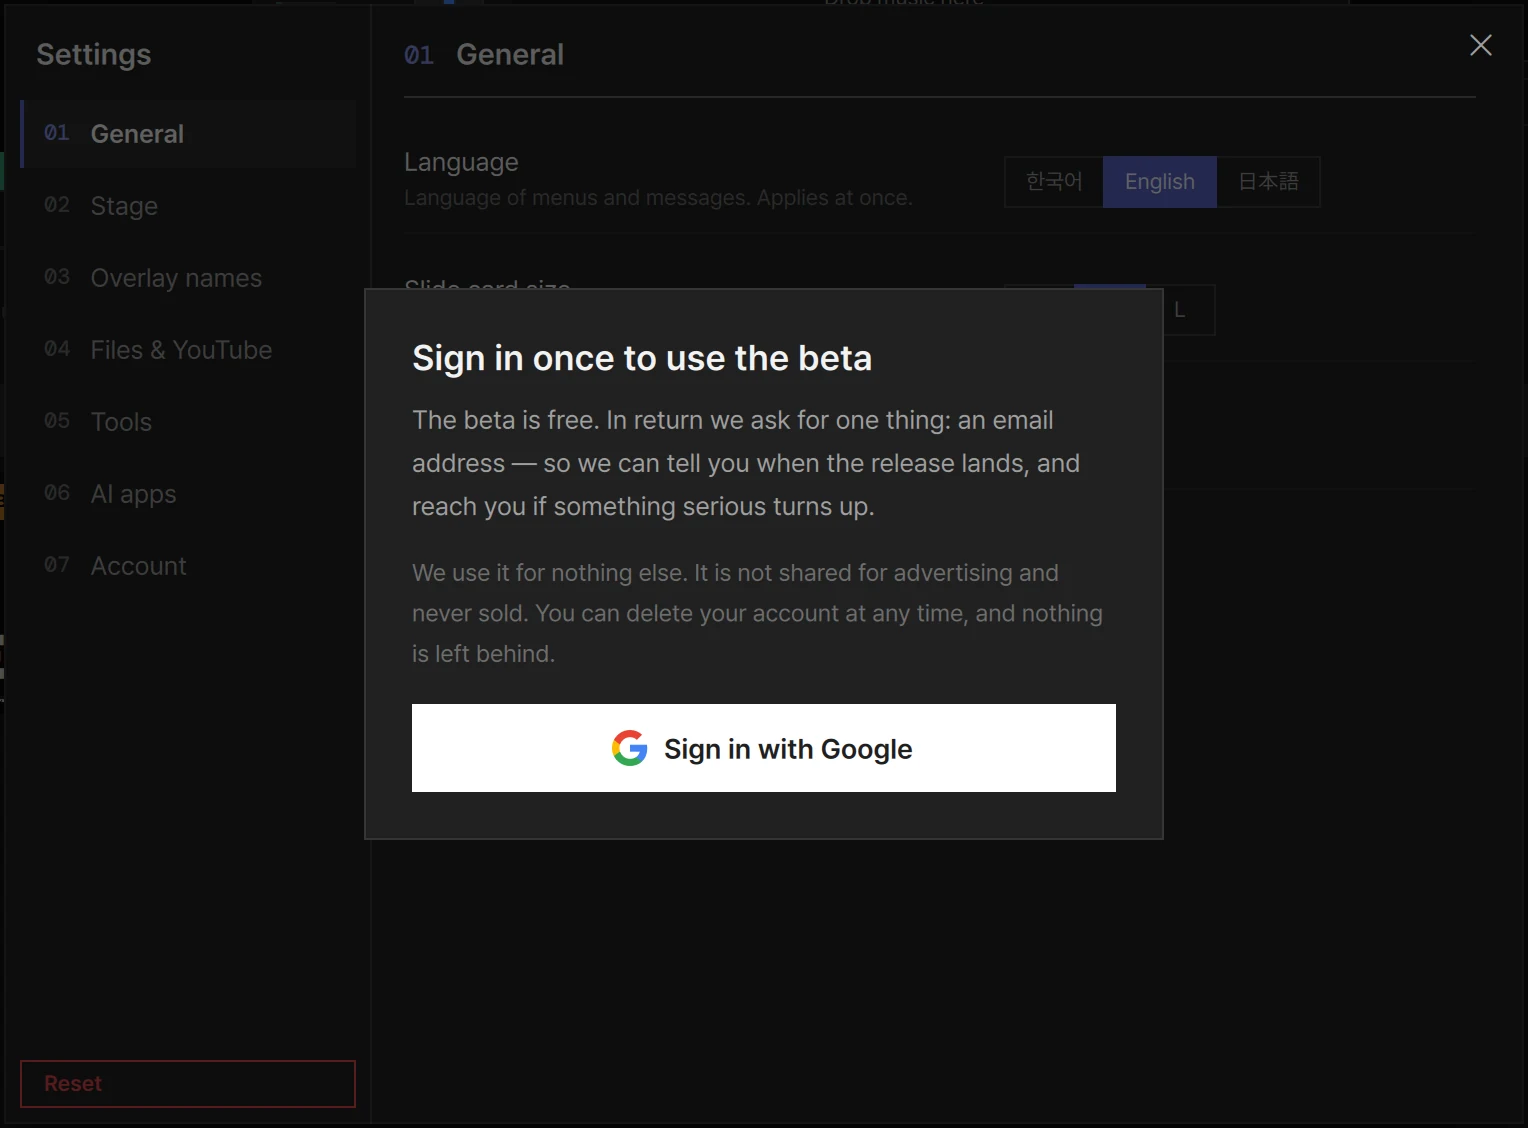
Section titled “Sign in first”Until you have signed in, a panel covers the Settings window: Sign in once to use the beta. It says what the email address is for — telling you when the release lands, and reaching you if something serious turns up — and that it is used for nothing else.
- Press Sign in with Google. Your browser opens.
- The button now reads Finish in your browser, then come back. Sign in there.
- Come back to LayerCue. The panel goes away and Settings is yours.
If you closed the browser or changed your mind, press Never mind under the button. If signing in fails, the reason appears in a red box on the panel.
The settings stay visible under the panel, so you can see what is there before you sign in. The panel covers only this window.
General
Section titled “General”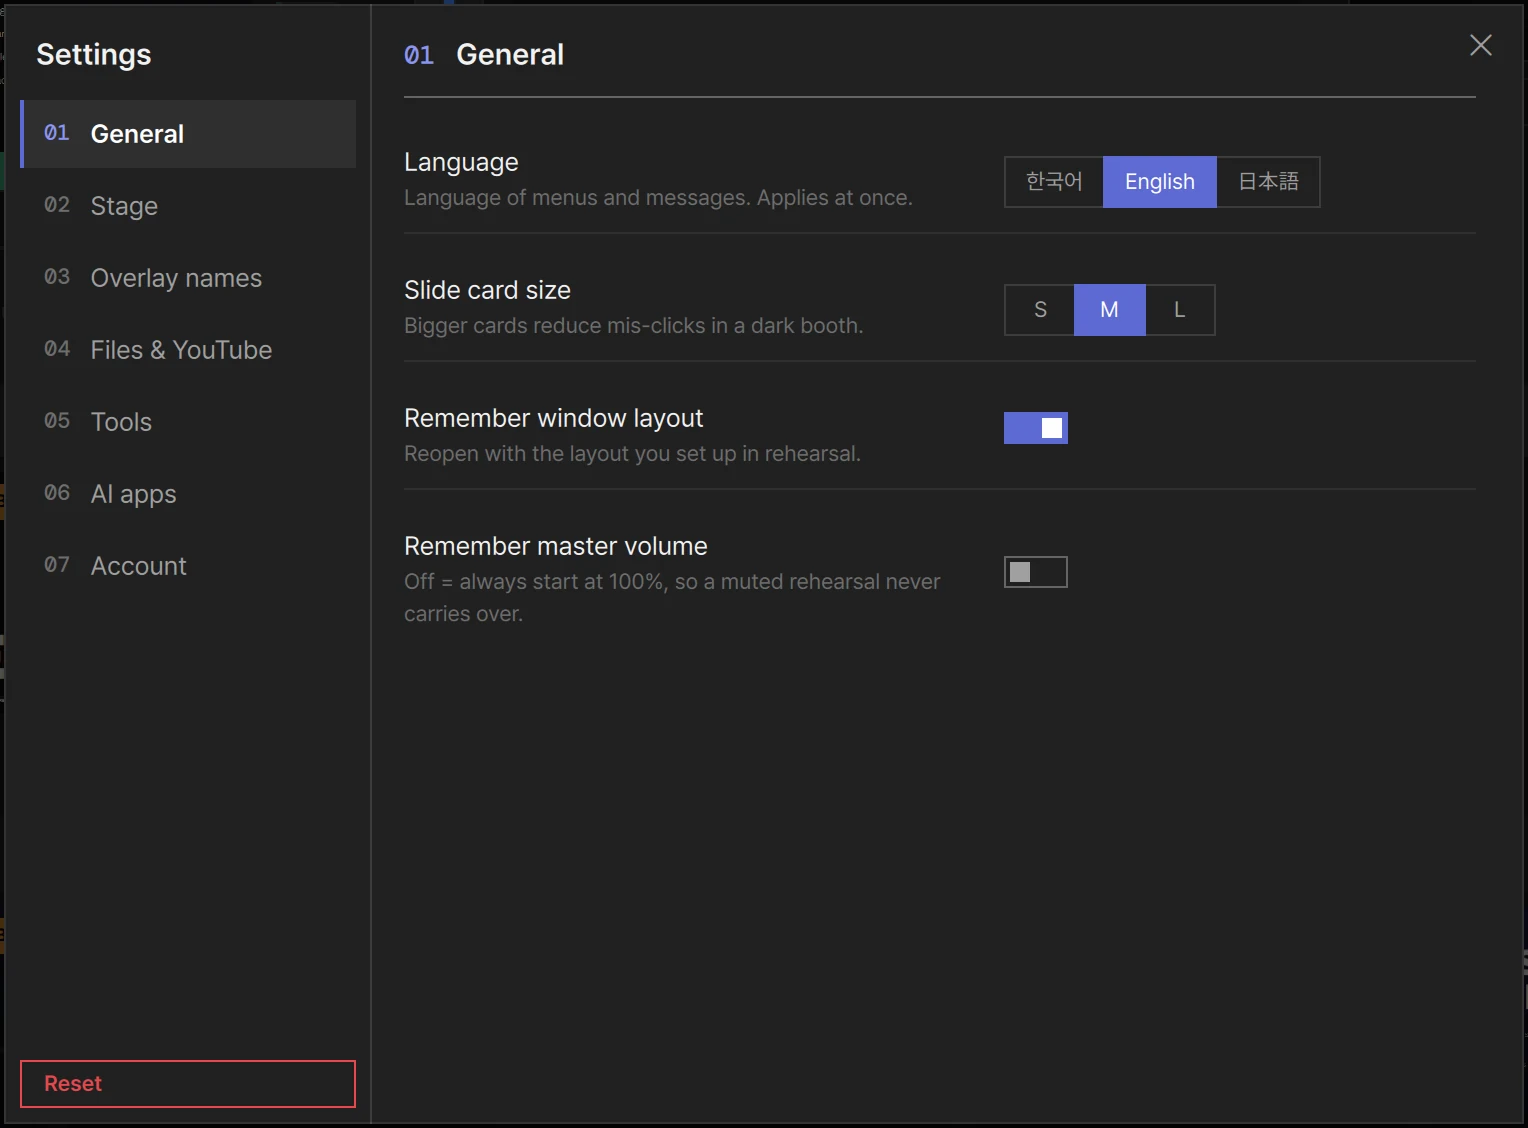
Language
Section titled “Language”Click one of the three — 한국어 · English · 日本語. Menus and messages change on the spot; there is no need to restart.
Until you choose one, LayerCue goes by the system language: Korean gives 한국어, Japanese gives 日本語, anything else gives English. Names you type yourself, such as overlay names, are never translated.
Slide card size
Section titled “Slide card size”How big the slide cards are. Bigger cards mean fewer mis-clicks in a dark booth. There are three ways to set it, and all three change the same value:
| Where | What you can do |
|---|---|
| Settings › General | S · M · L — 170, 210 or 260 pixels wide |
| The small slider near the right end of the status bar | 130–340 pixels, in steps of 10 |
⌘+ / Ctrl++ and ⌘− / Ctrl+− |
20 pixels at a time, while the slide list has focus |
The size is kept for next time, and it holds however wide the window is.
Remember window layout
Section titled “Remember window layout”On by default. When you quit, LayerCue writes down the window’s size and position and whether the sidebar was collapsed, and opens the same way next time — the layout you set up in rehearsal is the one you get at the event.
Remember master volume
Section titled “Remember master volume”Off by default: the master fader beside the meter starts at 0 dB — its normal level — every time you open LayerCue.
The fader itself is described in Sound and the meter.
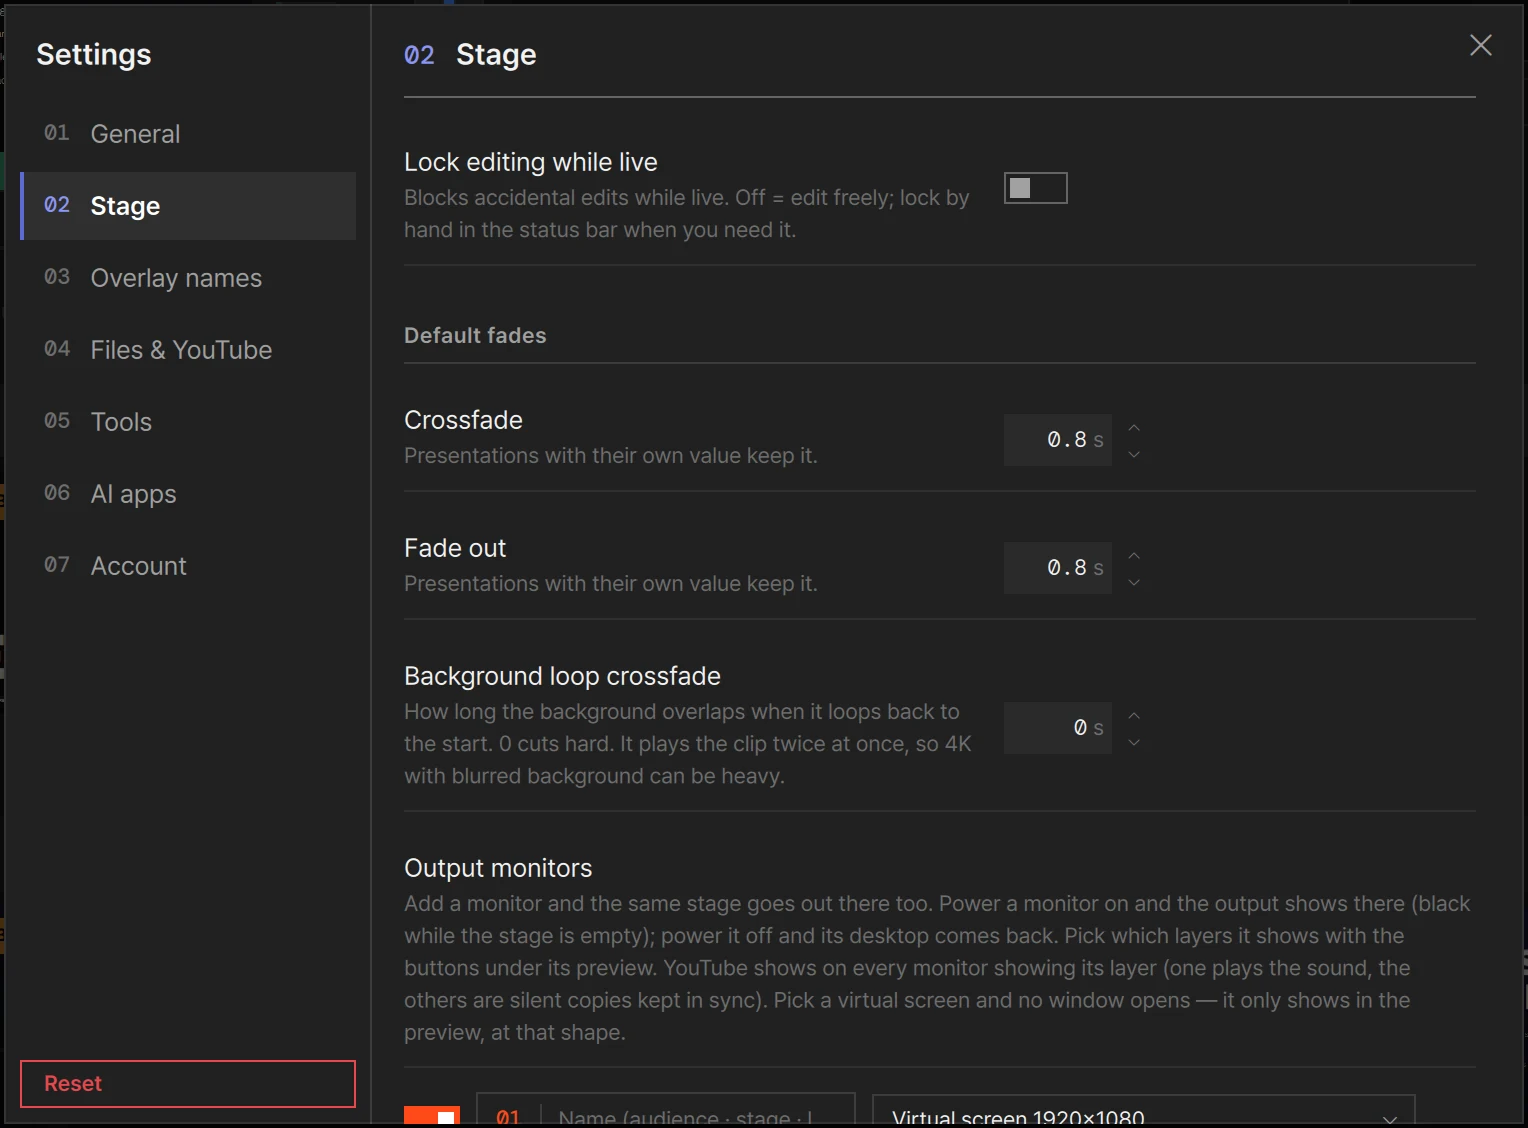
What these values do on stage is covered on their own pages; this section says where they are and where they start. In the order they appear:
| Value | Out of the box | Range |
|---|---|---|
| Lock editing while live | Off | — |
| Default fades › Crossfade | 0.8 s | 0–5 s |
| Default fades › Fade out | 0.8 s | 0–5 s |
| Default fades › Background loop crossfade | 0 s | 0–5 s |
| Output monitors | Output 1 only | — |
| Virtual screens | 1920×1080 and 3840×2160 | — |
| Music › Music fade in | 0.8 s | 0–5 s |
| Music › Music fade out | 1.2 s | 0–5 s |
| Music › Music crossfade | 1.5 s | 0–5 s |
| Music › Music while video plays | Keep | Keep · Lower · Mute |
| Music › Lower to (only while Lower is chosen) | 0.25 | 0–1 |
| Auto-dismiss | 0 s (off) | 0–120 s |
Lock editing while live
Section titled “Lock editing while live”Off by default. With it on, editing locks the first time you put something on stage while a monitor is on air, and LayerCue tells you so: Live — editing locked (unlock in the status bar). When no monitor is on air any more, LayerCue takes that lock off again.
It is off by default for a stage reason: fixing the next cue while the show is running is common, and a lock you did not expect looks like a broken app.
You can lock and unlock by hand at any time with the button near the right end of the status bar — a pencil while editing is unlocked, a padlock while it is locked (Lock editing / Unlock editing). What the lock stops is in Screens and going live.
Default fades and Auto-dismiss
Section titled “Default fades and Auto-dismiss”Crossfade, Fade out and Auto-dismiss are the values every presentation starts with. Each presentation follows them until you give it its own value in its Presentation settings. The line under each one says so: Presentations with their own value keep it.
Auto-dismiss sits at the very bottom of the page, under the music values, but it is about overlays: how many seconds an overlay stays up before it takes itself down. At 0 it is off, and overlays stay until you take them down.
Background loop crossfade
Section titled “Background loop crossfade”How long a repeating background video overlaps itself when it jumps back to its start. At 0 — the default — the loop cuts straight back.
A slide can have its own value: Loop crossfade in its Repeat settings, with Use default to follow this one again. See Slide settings.
Output monitors
Section titled “Output monitors”This list is where Multi-Output is set up: every monitor LayerCue sends to has a row. The same stage goes out to all of them. Which layers each one shows is chosen with the Layers shown strip under its preview in the top band, not here — see Multi-Output.
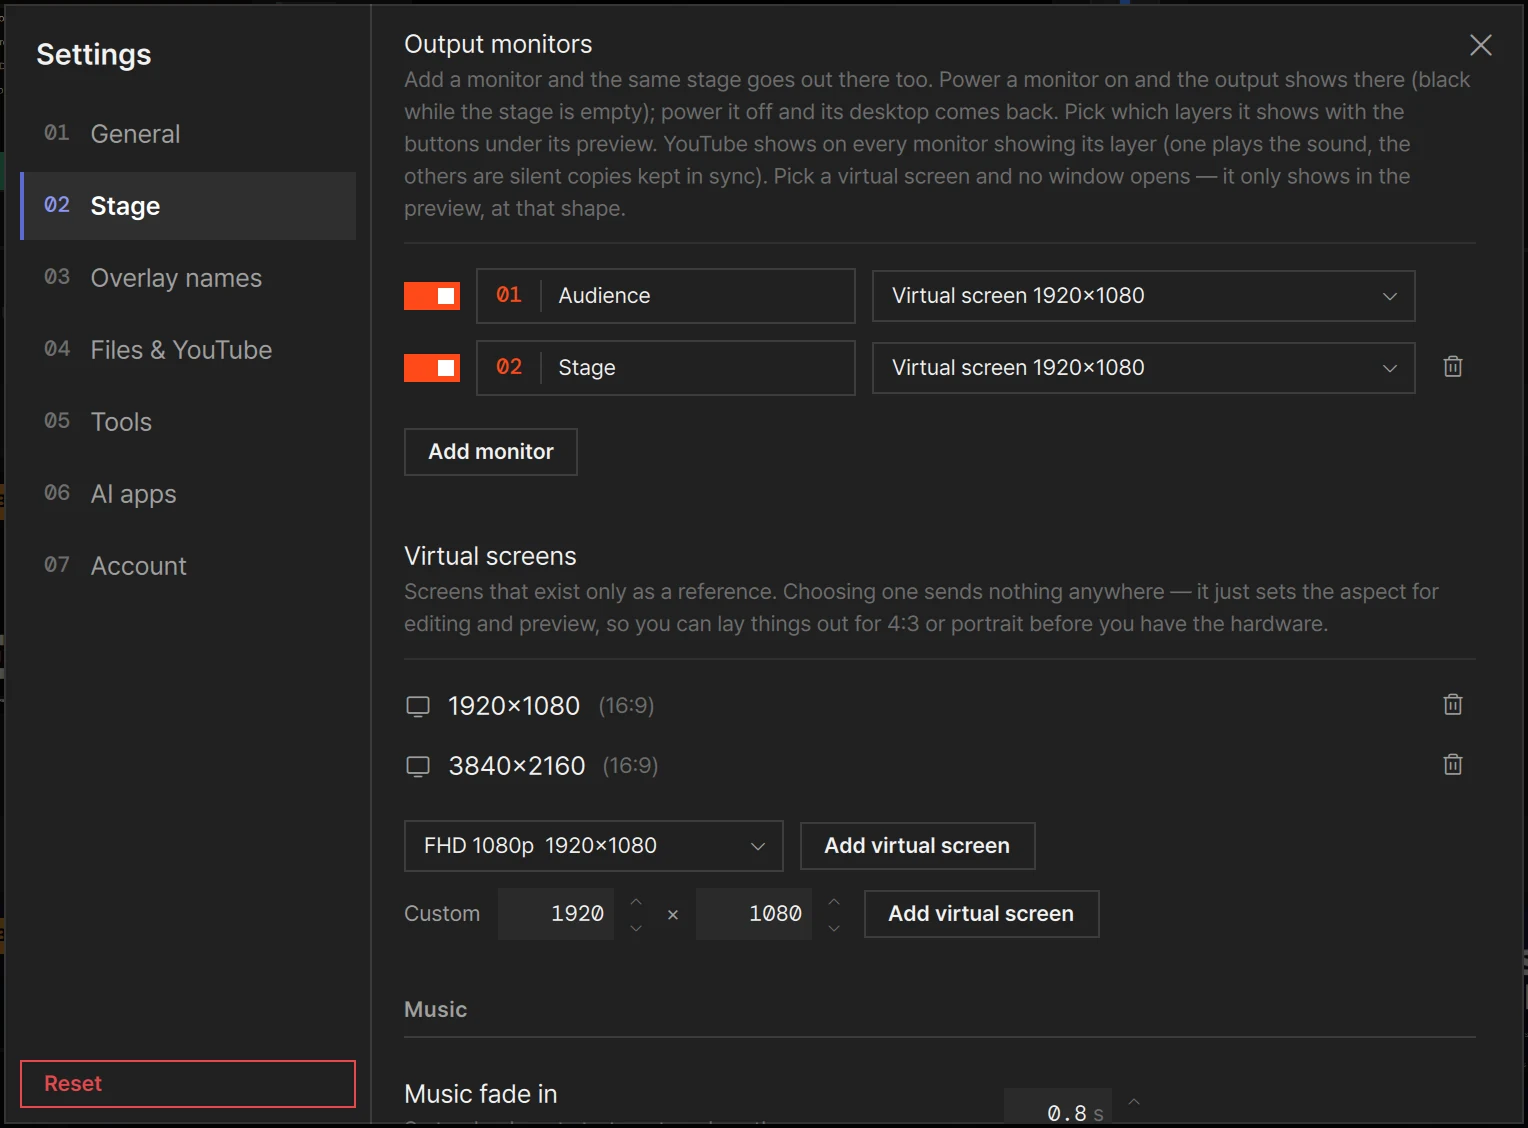
Each row, from left to right:
| What it does | |
|---|---|
| Power switch | That monitor’s output window. On (orange): the window is up on its screen — black while nothing is on stage. Off: the window goes and the desktop shows. It is the same switch as the one at the right end of the monitor’s header in the top band, and it is remembered |
| Number and name | Type a name where it says Name (audience · stage · lobby …) — up to 24 characters. It saves when you press Return / Enter or leave the field. Without a name it is Output 1, Output 2 … The name shows on the monitor’s tab in the top band and in the status bar |
| Screen | Where that monitor’s picture goes — the same list as in the popover of its tab above the stage preview, and Output 1’s is chosen here too. Until you choose one it says Pick a screen, and while the chosen screen is unplugged its name ends in · not connected |
| Bin | Removes that monitor. Output 1 always stays |
Add monitor adds a row. The new monitor starts with its power on, every layer shown, and the first external screen no other monitor is using — if every screen is taken, it says Pick a screen. If its screen is plugged in, its window opens straight away.
The Screen list holds the screens plugged in now, screens you used before — dimmed, with · not connected after the name, while they are unplugged — and, below a thin line and in lighter text, the virtual screens. Choose a virtual screen for Output 2 or later and no window opens anywhere: the monitor shows only in its preview, at that shape — a way to see what a monitor you do not have in front of you yet would show.
The line under Output monitors sums up these rules. The list belongs to this computer: it is not kept in your account, and Reset leaves it as it is.
Virtual screens
Section titled “Virtual screens”A virtual screen is a size, not a destination. Choosing one sends nothing anywhere; it only sets a shape. As the screen of Output 1 it sets the shape that editing and the preview are drawn against — that is how you lay out a show for a 4:3 hall or a portrait wall before the projector is in front of you. As the screen of Output 2 or later it means that monitor opens no window and shows only in its preview (see above).
Each size in the list shows its shape beside it, for example 1920×1080 (16:9), with a bin button to remove it. To add one, pick a common size from the drop-down below the list — FHD 1080p · 4K UHD · HD 720p · 4:3 XGA · 4:3 SXGA+ · 16:10 WUXGA · Portrait 1080 · Portrait 4K · Wide 2:1 — and press Add virtual screen. For any other size, type the width and height in the Custom row and press the Add virtual screen beside them.
The sizes appear as Virtual screen … at the bottom of every screen list — in the popover of a monitor’s tab and in Output monitors — under your real screens. With no external screen connected, a fresh install starts Output 1 on the first size in this list, and moves it to a real screen by itself when you plug one in — unless another monitor already uses that screen.
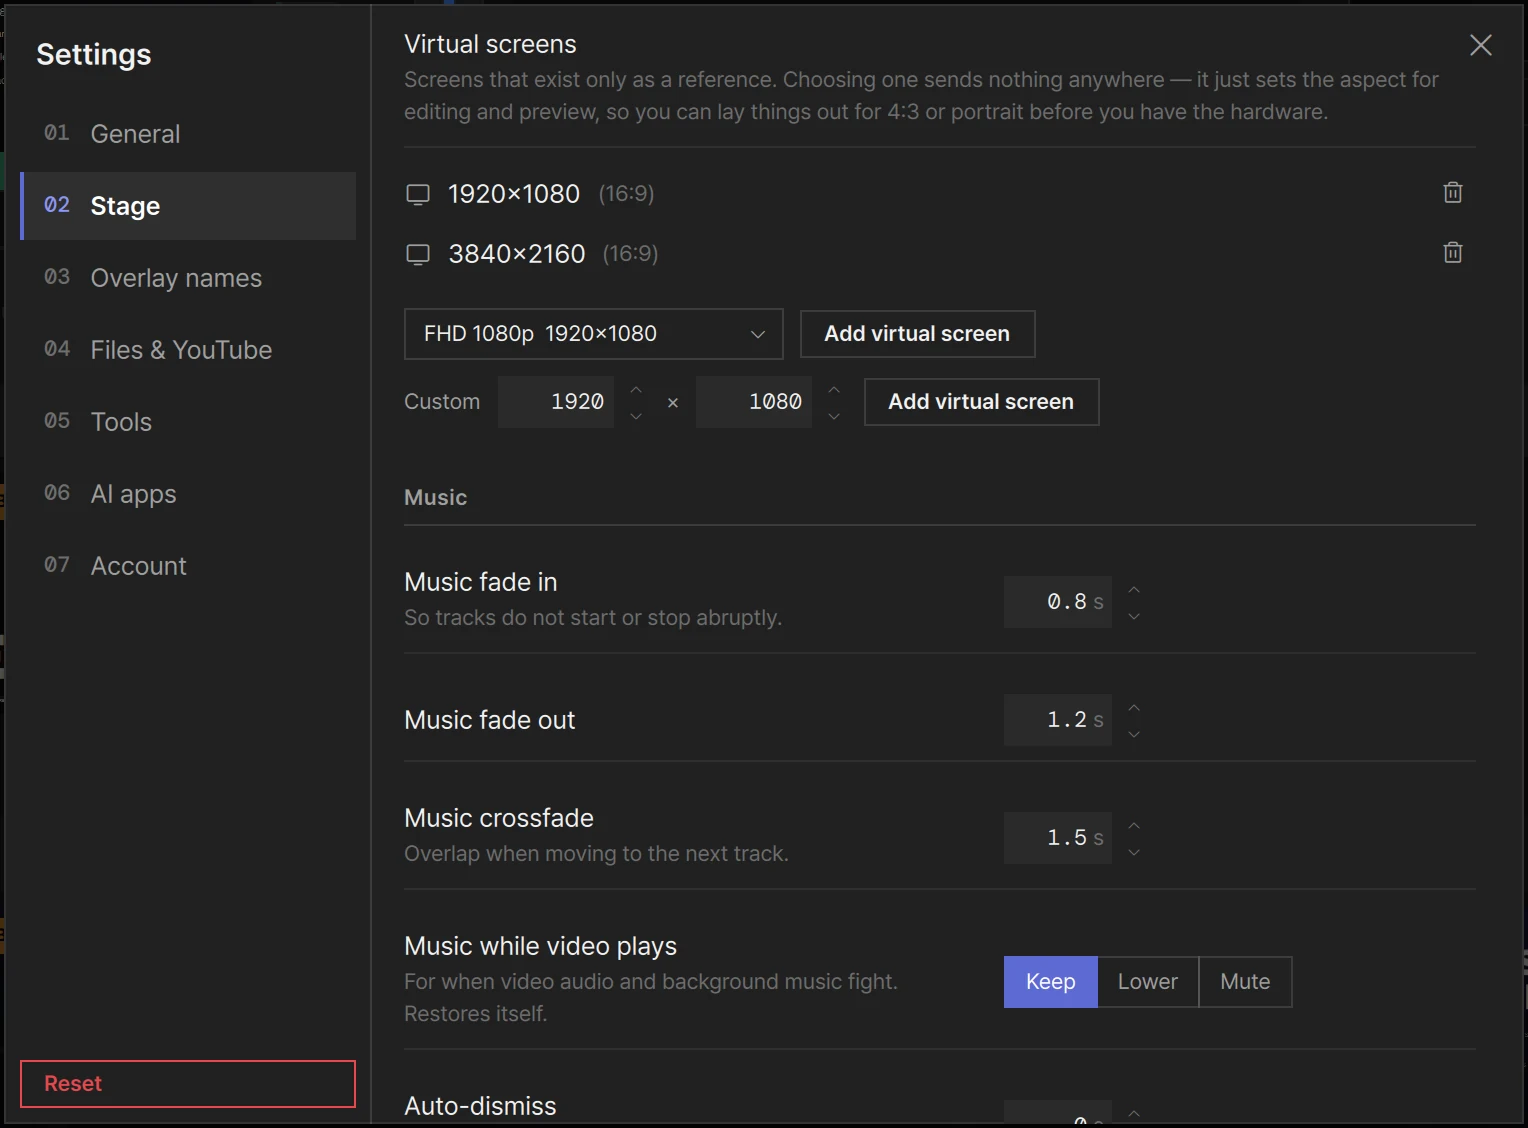
Four values decide how background music behaves:
- Music fade in and Music fade out — so tracks do not start or stop abruptly.
- Music crossfade — the overlap when one track moves on to the next.
- Music while video plays — what the music does while a slide with sound, such as a video, is playing on stage. Keep leaves it alone, Lower turns it down to the Lower to level (0 is silent, 1 is unchanged), Mute silences it. It comes back by itself when the sound on stage stops.
More in Music.
Overlay names
Section titled “Overlay names”Type a name into each of the five fields (up to 12 characters). It saves when you press
Return / Enter or leave the field. Leave a field empty and that overlay is plain
Overlay again.
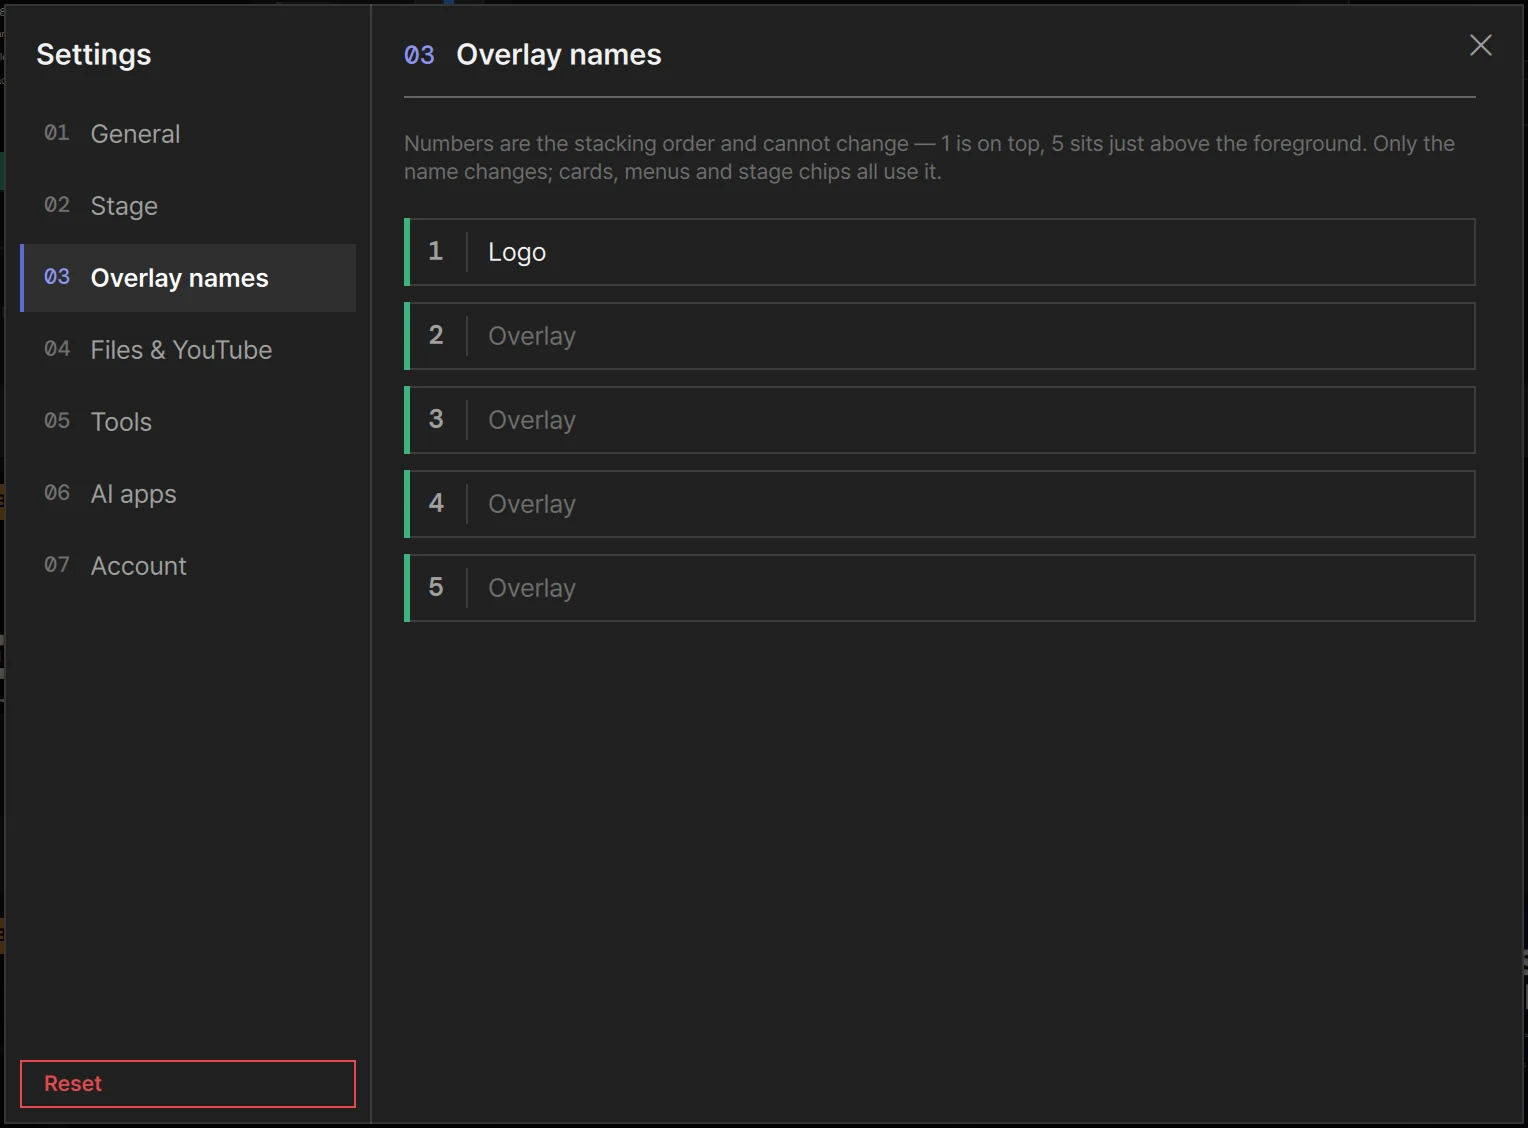
Once an overlay has a name, the chips on the cards, the menus, the layer column’s tooltips, the control row under the preview and Layer for this list all use it. The number always stays in front, so it reads 1 Logo.
Files & YouTube
Section titled “Files & YouTube”Media folder
Section titled “Media folder”When you add a video, a picture or music, LayerCue copies it into this folder, sorted into
folders such as Videos, Images and Music. YouTube downloads go there too. The line under
Media folder shows where it is.
| Out of the box | |
|---|---|
| Mac | LayerCue in your Documents folder |
| Windows | LayerCue in your user folder (C:\Users\<you>\LayerCue) — not in Documents, so OneDrive does not sync your videos |
- Choose… — pick another folder. From then on, new files are copied there. Files already copied stay where they are.
- Open — opens the folder in Finder / File Explorer.
Files left in the old folder now count as outside the media folder, so Import external files (below) can copy them across. Where everything else lives is in Where your files live.
Import external files
Section titled “Import external files”Copies slides’ video, picture and music files that live outside the media folder into it.
Each time you open this page, LayerCue counts them. If there are any, the line says N file(s) live outside the media folder — a disconnected disk breaks playback on stage. and the Import external files button lights up. Press it, and Copying N file(s) appears while they go in. If there are none, the line reads Every file is inside the media folder. and the button is dimmed.
Import bundle
Section titled “Import bundle”Choose… brings in a presentation bundle (.pplistx) exported from LayerCue on another
computer. The presentation goes straight into the library you have open — or the first library,
if none is open. Pictures travel inside a bundle; videos and music do not, so those slides show
File missing until you point them at the files with Locate file.
YouTube
Section titled “YouTube”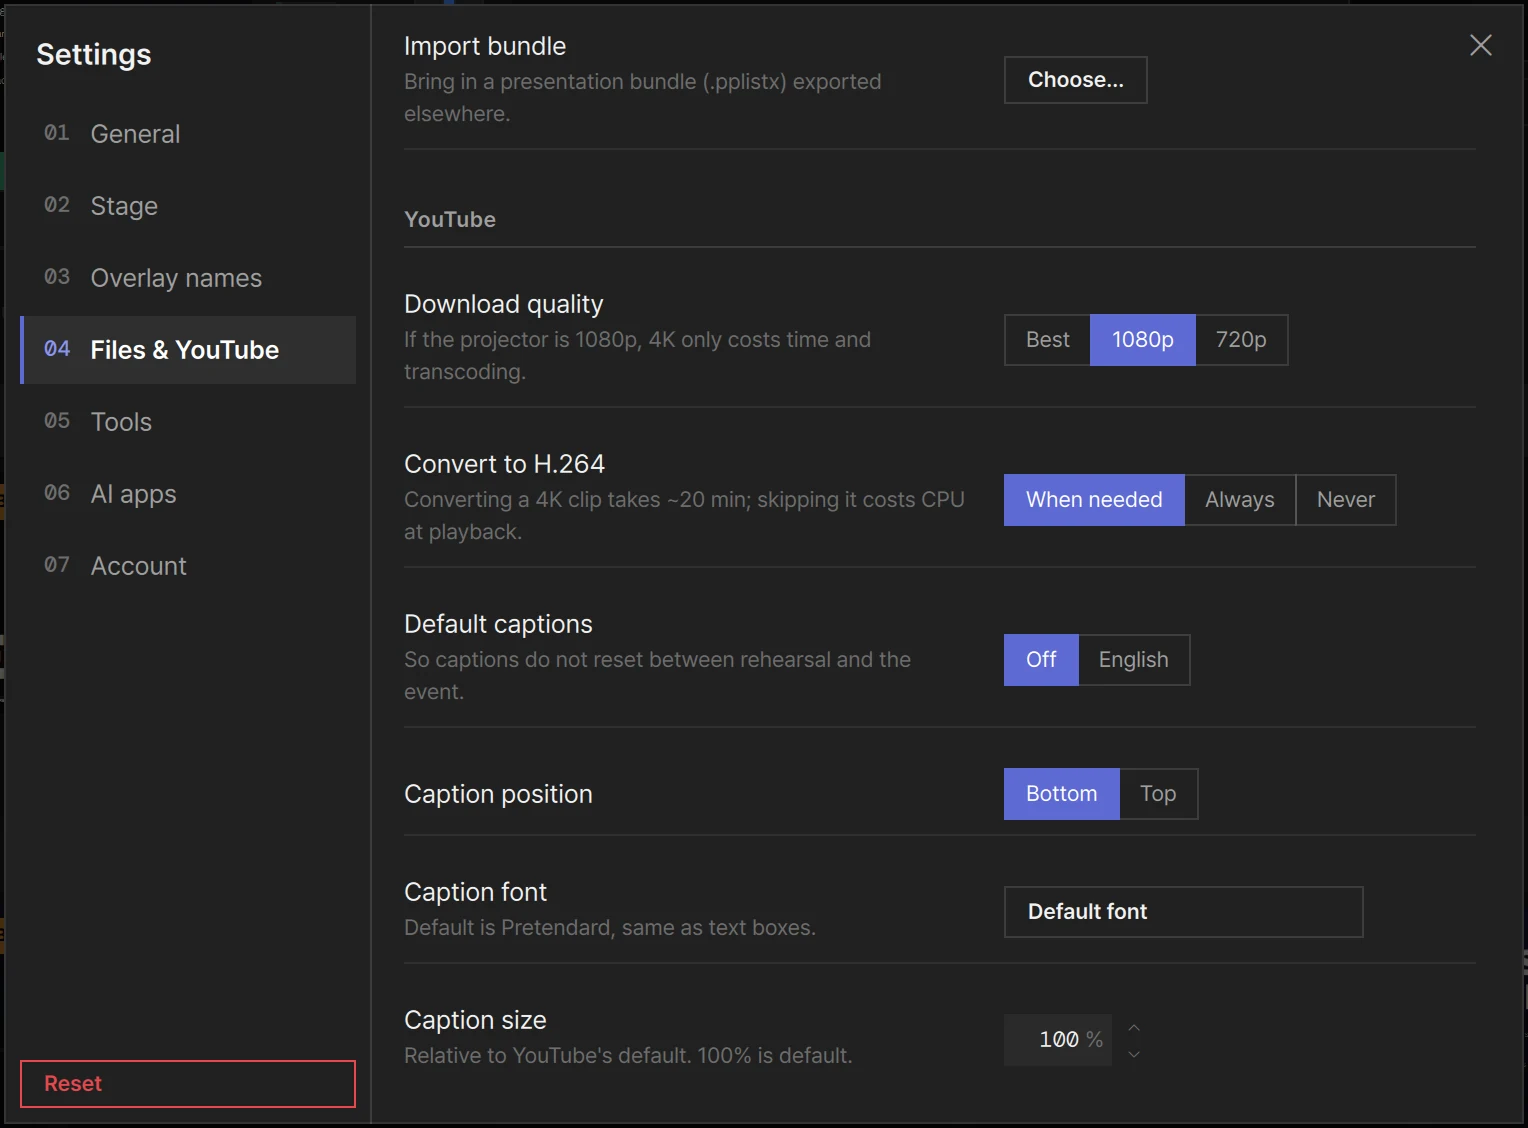
| Row | Choices | Out of the box |
|---|---|---|
| Download quality | Best · 1080p · 720p | 1080p |
| Convert to H.264 | When needed · Always · Never | When needed |
| Default captions | Off · English | Off |
| Caption position | Bottom · Top | Bottom |
| Caption font | Any font in the list | Pretendard, the same as text boxes |
| Caption size | 50–300% | 100% |
- Download quality is the highest resolution LayerCue fetches. If the projector is 1080p, 4K only costs time and a conversion. If a video does not go that high, it takes the best it has.
- Convert to H.264 — When needed converts only when the video did not arrive as H.264 or HEVC, which usually means 4K. Converting a 4K clip takes about 20 minutes; skipping it costs processor time during playback. The converter comes with LayerCue.
- Default captions is what captions start as each time LayerCue opens, so they do not reset between rehearsal and the event. The languages themselves are chosen and registered in the Captions row a YouTube slide shows; the registered list is shared by all YouTube slides.
- Caption position, Caption font and Caption size set how YouTube’s captions look wherever a streaming YouTube slide plays — on stage, in the previews and on every monitor — and a change shows at once. Pick the font from the same list as the slide editor. The size is measured against YouTube’s own caption size, so 100% is the size YouTube would use. Captions are drawn semi-bold with an outline.
Downloading, captions and the rest are in YouTube.
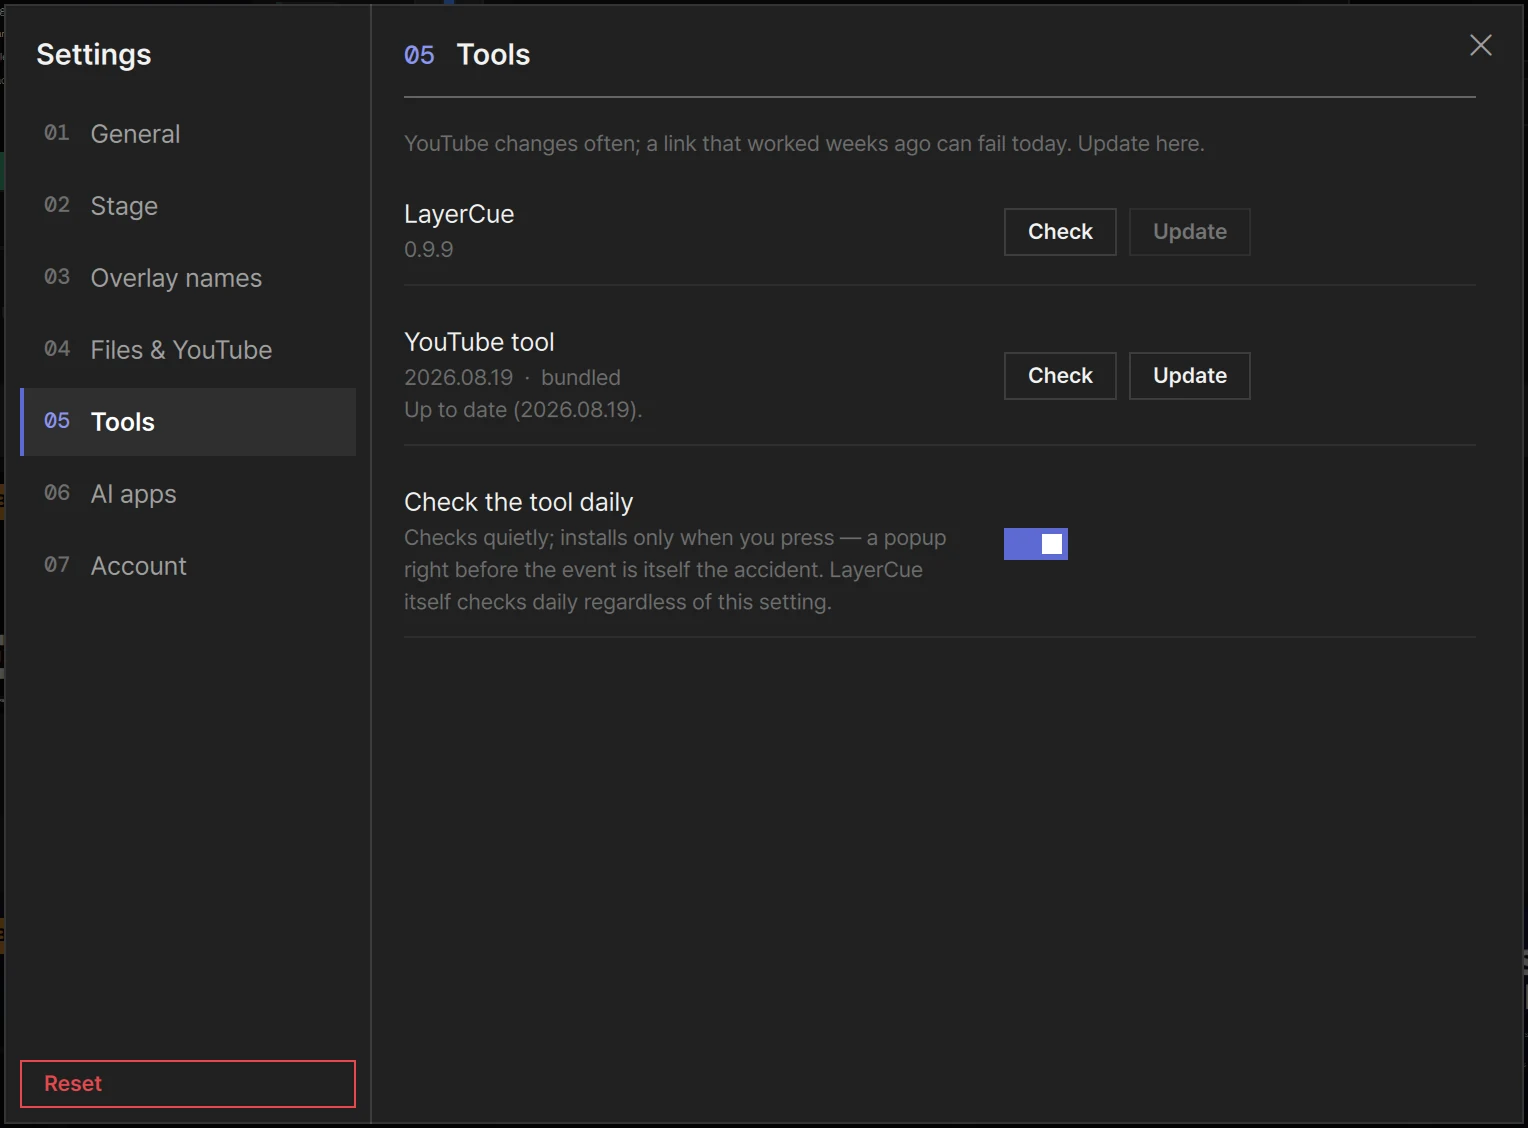
Two versions sit side by side here — LayerCue’s own, and the tool it uses for YouTube. They fix different things. When YouTube stops working, it is usually the tool that needs updating, not LayerCue.
LayerCue
Section titled “LayerCue”The line shows the version you are running.
- On a Mac, Check asks whether a newer version is out and says so either way. When one is, the line shows … available and Update lights up; it opens the same update window as the Update chip in the status bar. LayerCue also checks once a day on its own and shows that chip when there is something new.
- On Windows, updates come from the Microsoft Store. Check says Updates come automatically from the Microsoft Store. and Update stays dimmed.
YouTube tool
Section titled “YouTube tool”LayerCue downloads from YouTube with an outside tool called yt-dlp. The line shows its version (Not found if there is none) and, after it, where that copy came from:
| Word | Meaning |
|---|---|
| bundled | The copy that came with LayerCue |
| managed | A newer copy you fetched with Update |
| system | A copy installed on this computer separately |
| Button | What it does |
|---|---|
| Check | Asks whether a newer version exists. Nothing is installed |
| Update | Downloads the newest version and installs it. It lights up when a newer one is known |
| Revert | Deletes the copy you fetched and goes back to the one that came with LayerCue. Shown only after an update |
The progress — Checking…, Downloading… 40%, Installed — yt-dlp … — appears under the version, in your language. Before a new copy goes in, LayerCue makes sure it actually runs on this computer; if it does not, the install is cancelled and the old copy stays.
After Update or Revert, quit LayerCue and open it again, so downloads use the copy you just chose.
Check the tool daily
Section titled “Check the tool daily”On by default. When you open LayerCue and a day has passed since the last check, it asks quietly whether a newer yt-dlp is out. If there is one, a notice says yt-dlp … is available — Settings › Tools, and a small wrench chip with an orange dot appears near the right end of the status bar. Click it and Settings opens at Tools. The notice passes; the chip stays until you update.
AI apps
Section titled “AI apps”Here you connect AI apps on this computer — such as Claude Desktop, LM Studio or Cursor — so they can use LayerCue as a tool: build cue sheets and split lyrics into slides just by asking. LayerCue and the AI app talk only on this computer, and only while LayerCue is open — but what the AI app reads, such as lyrics and cue sheets, may be sent on to that AI service.
The line at the top of the page says this, and ends with the step people miss: after connecting, quit the AI app completely and open it again. Under it, Status says whether an AI app is attached right now, Register with an AI app has a row for each app with its state and a button to connect or remove it, and Other AI apps gives the command or settings to paste for the rest. The whole story is in Connect an AI app.
Account
Section titled “Account”| Row | What it does |
|---|---|
| Your name | You are signed in as and your email. Sign out signs you out, and the sign-in panel covers this window again |
| Keep settings in my account | Off by default. See below |
| Privacy Policy · Terms of Service | Open the Privacy Policy and the Terms of Service in your browser |
| Delete account | Opens your browser, where you confirm. Once deleted, nothing is kept — not the email, not the licence |
Keep settings in my account
Section titled “Keep settings in my account”With this on, the settings on this computer are kept in your account, so signing in on another computer brings them along.
- Turning it on sends this computer’s settings up. It does not overwrite them with what is in the account.
- From then on, a change you make goes up a moment later. If it could not be sent, the row says Not saved to your account yet. and it tries again the next time you change something.
- When LayerCue opens, or when you sign in, the settings in your account come down.
Only settings travel. Presentations and media files never leave this computer. Things tied to this machine stay put: the media folder location, the output monitors, the virtual screens, the window layout, the slide card size and the presentation you were last on.
Reset at the bottom of the page list — the button with the red outline — asks Reset every setting to its default. The red Reset carries it out; Cancel leaves everything as it is. There is no undo.
| Goes back to the start | Stays as it is |
|---|---|
| Language | Slide card size |
| Both Remember… switches | The saved window size and position |
| Every value on Stage except the output monitors — the virtual screens too (back to 1920×1080 and 3840×2160) | The output monitors: their names, screens, power and Layers shown |
| The overlay names | Your sign-in, and Keep settings in my account |
| The media folder location, and every YouTube choice, the caption look included | The YouTube tool copy you fetched with Update |
| The caption languages you registered (back to this computer’s language and English) | AI app connections |
| Check the tool daily (back to on) |
If Keep settings in my account is on, the reset values go up to your account too.
Shortcuts
Section titled “Shortcuts”| Keys | What they do |
|---|---|
Esc |
Close the Settings window (clicking outside closes it too) |
⌘+ / Ctrl++ · ⌘− / Ctrl+− |
Slide card size, 20 pixels at a time, while the slide list has focus |
⌘\ / Ctrl+\ |
Collapse or expand the sidebar (not while the slide editor is open) |
⌘B / Ctrl+B |
Collapse or expand the sidebar, while the slide list has focus |
⇧ / Shift with a number field |
10× at a time |
⌥ / Alt with a number field |
0.1× at a time |
Every shortcut in LayerCue is in Keyboard shortcuts.